Why Bathroom Snagging Cannot Be Overlooked
Bathrooms are the second most common source of snagging defects in new build homes, and they’re potentially the most damaging. Unlike a scratched kitchen door or a scuffed skirting board, a bathroom defect often involves water — and water damage is insidious. A tiny leak from a poorly sealed bath or shower tray can seep through the floor structure for months, damaging joists, plasterboard, and ceiling finishes in the rooms below before any visible signs appear. By the time you notice a damp patch on a downstairs ceiling, the repair bill can easily run into thousands of pounds.
The average new build bathroom contains between 10 and 15 snagging items. These range from cosmetic issues like scratched sanitaryware and patchy grout through to serious functional problems including leaking waste connections, inadequate ventilation, poor water pressure, and tiling that doesn’t meet British Standards. Every bathroom and en-suite in your new build needs a thorough inspection, and this guide shows you exactly what to check.
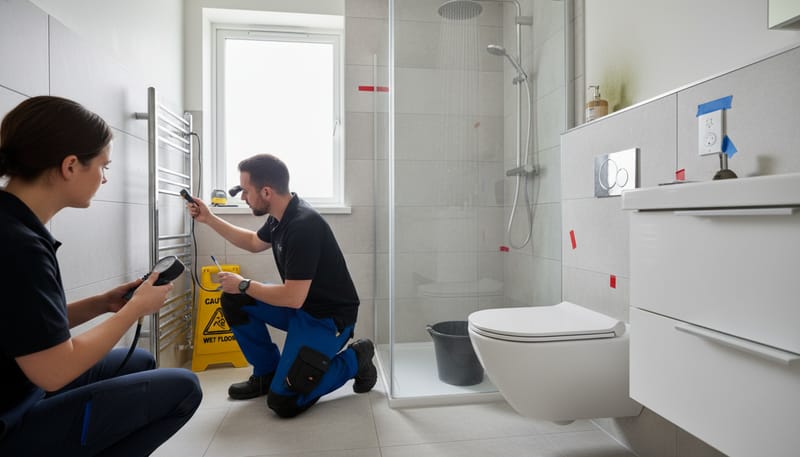
A proper bathroom snagging inspection should take 20–30 minutes per bathroom. You need to test every water outlet, check every seal, inspect every tile, and verify that ventilation meets Building Regulations. Bring a torch, a small spirit level, a piece of tissue paper for detecting leaks, and your snagging checklist. Let’s work through each area systematically.
Bath Seal and Level
Start with the bath itself. Place your spirit level across the bath in both directions to check it’s level. A bath that’s not level will pool water at one end rather than draining cleanly, and more importantly, a tilted bath puts uneven stress on the seal along the wall, causing it to crack and fail over time.
The silicone seal between the bath and the wall tiles is arguably the single most important seal in the house. Fill the bath completely with cold water before inspecting the seal — the weight of the water (a standard bath holds around 150 litres, weighing 150kg) will push the bath down on its legs, opening up any weakness in the seal. With the bath full, run your eye along the entire length of the seal looking for gaps, cracks, or areas where the silicone has pulled away from the tile or the bath rim.
Now release the plug and listen. The water should drain quickly and quietly. A slow drain may indicate a blockage, a poorly installed waste trap, or insufficient fall on the waste pipe. Gurgling sounds often indicate a venting problem in the waste system. While the bath drains, check underneath for any leaks at the waste fitting, the overflow connection, and along the visible pipework. If the bath panel is removable, take it off and inspect the full underside of the bath. Check that the bath is properly supported — acrylic baths must have a cradle or support frame, not just rest on their feet.
Shower Tray and Enclosure
Shower trays and enclosures are the most leak-prone installations in any bathroom. The combination of high water volumes, frequent temperature changes, and complex sealing requirements means that even small installation errors can lead to significant water escape.
Start by checking the shower tray is level and firmly bedded. Press down on the centre and each corner of the tray — there should be no flex, movement, or hollow sounds. If the tray flexes under your weight, it will eventually crack the seal around its perimeter. Check the seal between the tray and the wall tiles, which should be a continuous bead of sanitary-grade silicone with no gaps or voids.
Low-profile shower trays (the flat, almost flush-to-floor type now standard in most new builds) need particular attention. Because they sit so close to the floor, even a slight installation error can cause water to pool at the edges rather than flowing to the drain. Check the fall across the entire tray surface by pouring water at each corner and along each edge — it should all flow steadily towards the waste outlet. If water collects anywhere other than at the drain, the tray has been installed without sufficient fall or has not been properly levelled.
For the shower enclosure, check that the door or screen is firmly fixed to the wall and tray with no loose brackets. Glass panels should be plumb and the door should open and close smoothly without catching on the tray or frame. Magnetic seals on hinged doors should make full contact when closed. Run the shower at full pressure for at least five minutes with the door closed, then check outside the enclosure for any water escape. Pay particular attention to the corners where the screen meets the wall and the bottom where the screen meets the tray — these are the most common leak points.
If the shower has a thermostatic mixer valve — which is standard in most new build bathrooms — test the temperature stability by running the shower at a comfortable temperature and then flushing the WC or running the basin tap simultaneously. The shower temperature should remain stable with no sudden spikes or drops. Under BS EN 1111, thermostatic mixing valves must limit the output temperature to prevent scalding, and most are factory-set with a maximum of 48°C. Check that the temperature control has a physical stop at this point. A mixer valve that allows sudden temperature fluctuations is both a comfort and a safety issue that the developer must address under the building regulations.
If your bathroom has a walk-in shower with a wetroom-style floor, the entire floor area should be tanked (waterproofed) and fall towards the drain at a minimum gradient of 1:80. Test this by pouring water across different areas of the floor — it should all flow towards the drain with no pooling. Any pooling indicates an incorrect fall that could allow water to find its way through joints in the tanking membrane.
WC Fixing, Flush, and Basin Installation
The WC (toilet) should be firmly fixed to the floor with no rocking or movement when you sit on it. Grab the bowl and try to move it side to side — any movement indicates loose fixings or an uneven floor beneath. The seal between the WC base and the floor should be a neat bead of silicone, and the cistern should be firmly fixed to the wall (for wall-hung or close-coupled concealed cisterns) or securely sitting on the pan (for close-coupled exposed cisterns).
Flush the WC several times and check that the flush is powerful enough to clear the bowl effectively, that the cistern refills within 60–90 seconds, and that it stops filling completely without any continuous running water sound. A running cistern is one of the most common plumbing defects in new builds and wastes a significant amount of water. Also check that the cistern doesn’t overflow by waiting for it to fill completely and verifying that the water level sits below the overflow tube.
For wall-hung WCs (increasingly popular in new builds), check the frame fixings by sitting on the WC and applying your full weight. The unit should feel completely solid with no movement or creaking. Wall-hung WCs are fixed to a concealed steel frame behind the plasterboard, and any looseness suggests the frame has not been properly secured to the wall structure. The flush plate should sit flush with the tiled wall, and both the small and large flush buttons should operate smoothly and return to their resting position after each press.
The basin should be firmly fixed to the wall or vanity unit with no movement. Check the seal around the basin where it meets the worktop (vanity basins) or the wall (wall-hung basins). Fill the basin, then release and check for leaks at the waste, trap, and connections below. The taps should operate smoothly with no drips, and hot water should arrive within a reasonable time. If the basin has a pop-up waste mechanism, check that it operates correctly and holds water when closed.
Tiling, Grout and Silicone
Bathroom tiling is one of the most visible aspects of the fit-out, and defective tiling is immediately obvious. Start with an overall visual inspection from the doorway, then examine each wall closely. Tiles should be straight, level, evenly spaced, and consistent in colour. Use your spirit level to check that tile courses are truly horizontal — even a slight deviation is visible to the eye and indicates poor workmanship.
Tap each tile gently with your knuckle and listen for hollow sounds. A tile that sounds hollow (significantly different from its neighbours) means the adhesive behind it is incomplete, and the tile is liable to crack under pressure or eventually fall off. Under BS 5385, wall tiles must have a minimum of 95% adhesive coverage in wet areas. Hollow tiles in a shower enclosure are a particularly serious defect because water can penetrate behind them.
Check the grout carefully. It should be consistent in colour, fully filling every joint to the same depth, with no cracks, pinholes, or missing sections. Where tiles meet the bath, shower tray, sink, or other sanitaryware, silicone sealant must be used instead of grout to accommodate the natural movement between the rigid tiled wall and the flexible sanitaryware. Check every silicone joint for completeness, adhesion to both surfaces, and a smooth, consistent finish. Poorly applied silicone is one of the most common bathroom snagging items — it should be neat, continuous, and free from gaps or tooling marks.
Ventilation Fan and Towel Rail/Radiator
Bathroom ventilation is a Building Regulations requirement under Approved Document F. Every bathroom and en-suite without an openable window must have a mechanical extract fan, and even those with windows benefit from one. The fan must be capable of extracting at least 15 litres per second for intermittent use or 8 litres per second for continuous use.
Test the fan by switching on the bathroom light (most bathroom fans are wired to the light switch with an overrun timer). The fan should start immediately and continue running for a set period (usually 15–20 minutes) after the light is switched off. Hold a sheet of tissue paper near the fan grille — it should be visibly drawn towards the intake. If the tissue barely moves, the fan may be undersized, poorly ducted, or the external vent may be blocked. Check the external vent or grille to confirm it’s clear and that the backdraft shutter operates freely.
The heated towel rail or bathroom radiator should be firmly fixed to the wall with no wobble. Turn the heating on and check that the entire unit heats up evenly — cold spots at the top usually indicate trapped air that needs bleeding, while cold sections lower down may suggest an installation fault. The thermostatic radiator valve (TRV) should adjust smoothly between settings. If the bathroom has underfloor heating instead of or in addition to a radiator, test this separately with its own thermostat.
Water Pressure and Drainage Speed
Water pressure testing is essential in every bathroom. Test each outlet individually first (bath taps, shower, basin taps), then test multiple outlets simultaneously to check for pressure drops. Run the shower while someone flushes the WC — there should be no significant reduction in shower flow or temperature fluctuation. Under the Water Supply (Water Fittings) Regulations 1999, all outlets should receive a minimum dynamic pressure of 1.0 bar, though 1.5 bar is considered good and 2.0 bar is ideal.
For drainage, fill the bath and basin simultaneously, then release both plugs at the same time. Both should drain briskly without gurgling, backing up, or any foul odours from the waste pipes. A slow drain usually indicates a partial blockage, insufficient pipe gradient, or a missing air admittance valve (AAV) on the soil stack. Foul smells from waste outlets suggest that the trap seals have been lost, possibly due to poor venting of the drainage system.
Check the shower drainage rate by running the shower at full volume for five minutes with the enclosure door closed. The shower tray should not retain more than a few millimetres of standing water at the drain. If water backs up significantly, the waste pipe is either partially blocked or has insufficient fall. This is a defect your developer must correct under the NHBC warranty.
Mirror, Cabinet Fitting and Final Checks
Any mirrors, bathroom cabinets, or shelving units supplied by the developer should be firmly fixed to the wall, level, and undamaged. Check that mirrored cabinet doors open and close smoothly, that shelves are secure, and that any integrated lighting works. Wall fixings in bathrooms are particularly important because the walls are often plasterboard over a timber frame, which requires appropriate fixings (not just basic screws) to support heavy items.
Check the bathroom door for smooth operation. Internal bathroom doors should have a privacy lock that can be overridden from the outside in an emergency (usually with a coin or flat tool). If the bathroom is on an upper floor of a three-storey house, the door may need to be a fire door — check for the certification plug on the top edge as described in our common defects guide.
Finally, check the bathroom floor. Vinyl or tiled floors should be laid neatly with no lifting edges, and the seal between the floor covering and the base of the bath, WC, and other fixtures should be clean and complete. If the floor is tiled, check for lippage (steps between adjacent tiles) and hollow tiles, just as you would on the walls. The floor should feel solid underfoot with no bounce or creaking, which could indicate inadequate support or a poorly fitted subfloor.
A thorough bathroom inspection may seem time-consuming, but it’s one of the most valuable parts of your snagging process. Water damage from a defective bathroom installation can be devastating, and catching issues now saves both money and stress in the months and years ahead. If you want professional assurance, a qualified snagging inspector will test every bathroom system as part of their standard inspection — see our handover guide for advice on choosing one.