Understanding the Drying-Out Period: The Most Important Thing New Build Owners Must Know
Every new build home goes through what is known as a drying-out period, and understanding this is absolutely fundamental before you begin any decorating work. During construction, enormous quantities of water are used — in concrete foundations, mortar between bricks, plaster on walls, screed on floors, and grout in bathrooms. A typical three-bedroom new build house contains approximately 1,500 gallons (nearly 7,000 litres) of trapped moisture when you move in. All of that water needs to go somewhere, and the process of it evaporating out of your home is the drying-out period.
The drying-out period typically lasts between 9 and 18 months, though in some cases it can extend to two full years. The exact duration depends on several factors: the time of year you moved in (homes completed in summer tend to dry faster), the size of the property, how well-ventilated your home is, whether you use your heating system effectively, and the specific construction methods used by your developer. Timber-frame homes tend to dry out faster than traditional brick-and-block construction because they contain less moisture-retaining material.
During this period, you will notice several things happening in your home that are completely normal but can be alarming if you are not expecting them. Condensation on windows is extremely common, particularly in the first winter. You may see water pooling on windowsills, especially in bedrooms and bathrooms. Mould can appear in corners, behind furniture, and around window frames — this is not a defect but a consequence of the moisture leaving the structure. Hairline cracks will appear in walls and ceilings as plaster contracts during drying. Gaps may open up between skirting boards and walls, between door frames and plaster, and around window reveals. Nail pops — small bumps where nails push through the plaster surface — are another common occurrence.
The key point is this: almost all decorating decisions need to account for the drying-out period. Rushing to apply vinyl wallpaper, oil-based paint, or non-breathable finishes can trap moisture in the walls, leading to damp problems, peeling paint, and even structural issues. Patience during this phase will save you significant money and frustration in the long term.
How to Help Your Home Dry Out Faster
There are several proactive steps you can take to accelerate the drying-out process. First, maintain adequate ventilation throughout your home. Keep trickle vents on your windows open at all times — these are the small vents at the top of the window frame, and they are there specifically to allow moisture-laden air to escape. Open windows for at least 15 to 30 minutes each day, even in winter. If your home has mechanical ventilation with heat recovery (MVHR), which is increasingly common in new builds from 2024 onwards, make sure it is running continuously and that the filters are clean.
Second, use your heating system. It might feel counterintuitive to run the heating when it is not cold, but warmth helps moisture evaporate from walls and floors. During the first autumn and winter, run your heating at a consistent moderate temperature — around 18 to 20 degrees Celsius — rather than blasting it on and off. The NHBC specifically recommends maintaining a steady temperature rather than extreme heating cycles, which can cause plaster to crack more aggressively.
Third, manage humidity actively. A dehumidifier is one of the best investments you can make for a new build home. A good quality domestic dehumidifier costs between £150 and £300 and will pull litres of water from the air daily during the drying-out period. Many new build owners report emptying the tank twice a day during the first few months. Place the dehumidifier in the room that feels dampest, and move it around the house every few days for even coverage.
Fourth, avoid creating unnecessary moisture inside the home. Always use the extractor fan when cooking and showering. Dry clothes outside or in a tumble dryer rather than on radiators or indoor airers — drying a single load of washing indoors releases approximately two litres of water into the air. If you must dry clothes indoors, do so in a room with the door closed and a window cracked open.
When to Paint Your New Build Walls — And What Paint to Use
The question every new build owner asks within the first week is: "When can I paint the walls?" The answer is nuanced, but the general rule is that you can paint immediately — provided you use the right type of paint.
During the drying-out period, you must use breathable emulsion paint. This allows moisture to pass through the paint film and continue evaporating from the plaster beneath. The most commonly recommended approach is to use a water-based matt emulsion — specifically a trade-quality matt rather than a vinyl matt or vinyl silk. The word "vinyl" in paint names indicates a plastic-based binder that creates a less breathable barrier, and this is what you want to avoid during the first 12 to 18 months.
Recommended Paints for the Drying-Out Period
Several paint brands offer excellent breathable options suitable for new build homes during the drying-out phase:
Dulux Trade Supermatt is one of the most widely recommended paints for new plaster. It is specifically designed as a breathable matt emulsion and costs approximately £25 to £35 for a 5-litre tin. It provides good coverage and is available in a range of colours, though the colour range is more limited than Dulux's consumer lines.
Crown Trade Clean Extreme Matt is another excellent option, priced similarly at £28 to £38 per 5 litres. It is highly breathable, washable once dry, and available in a wide colour range through tinting.
Johnstone's Trade Covaplus Vinyl Matt — despite the "vinyl" in the name, Johnstone's Covaplus is widely used on new plaster and is considered sufficiently breathable for the drying-out period. It costs around £20 to £30 for 5 litres and offers excellent coverage.
Farrow & Ball Estate Emulsion is a premium option at approximately £50 to £55 per 2.5 litres. Farrow & Ball's estate emulsion is water-based and breathable, making it suitable for new plaster. However, at this price point, many decorators recommend waiting until after the drying-out period to apply Farrow & Ball, given that you may need to repaint once shrinkage cracks have been filled.
Little Greene Absolute Matt Emulsion is another premium breathable option at around £48 per 2.5 litres, with an exceptional colour range and good coverage on new plaster.
For the first coat on bare new plaster — if your developer has not already painted the walls — you should apply a mist coat. A mist coat is simply emulsion paint diluted with water (typically 70% paint to 30% water, though ratios vary by brand — check the tin). The mist coat seals the plaster, prevents the plaster from sucking all the moisture out of your topcoats, and provides a good base for subsequent layers. Apply one mist coat followed by two full-strength topcoats for the best finish.
Most developers will have already applied at least one coat of paint before handover, usually in brilliant white or magnolia. In this case, you do not need a mist coat — you can go straight to applying your chosen colour in breathable matt emulsion.
When to Switch to Your Preferred Finish
After 12 to 18 months — once the drying-out period is substantially complete — you can switch to any paint finish you prefer, including vinyl silk, eggshell, or even wallpaper. At this point, you should also fill any shrinkage cracks that have appeared (using a flexible filler like Toupret or Polycell), sand smooth, and then apply your final decorative finish. This is when many homeowners choose to invest in premium paints, feature walls, or wallpaper, knowing that the walls have settled and the finish will last.
Shrinkage Cracks, Nail Pops, and Settlement: When to Worry and When It's Normal
Shrinkage cracks are one of the most common sources of anxiety for new build homeowners, but in the vast majority of cases, they are completely normal and nothing to worry about. As the plaster, timber, and other materials in your home dry out and settle, small cracks will appear. These are typically hairline cracks — less than 1mm wide — and they tend to appear in predictable locations: above doorframes, at the junction between walls and ceilings, in corners where walls meet, and around window reveals.
The cracks appear because different materials expand and contract at different rates as moisture levels change. Plaster contracts as it dries. Timber shrinks as it loses moisture. Slight movement in the structure as the building settles on its foundations can also cause minor cracking. These hairline cracks are classed as cosmetic defects and are not structural issues.
Nail pops are small circular bumps or rings that appear on walls and ceilings. They occur when the timber behind the plasterboard shrinks as it dries, causing the nails or screws holding the plasterboard to the timber frame to push slightly forward through the plaster surface. Nail pops are extremely common in new builds and are, again, a cosmetic issue rather than a structural one.
When to Report Cracks to Your Developer
While most cracks are cosmetic, there are situations where cracks should be reported to your developer and investigated further. You should be concerned if cracks are wider than 2 to 3mm, if cracks are growing noticeably over time, if cracks appear in a stair-step pattern following the mortar joints in brickwork (which can indicate foundation movement), if cracks are accompanied by doors or windows that are increasingly difficult to open or close, or if you notice cracking on external walls. These types of cracks could indicate structural movement and should be reported under your NHBC warranty immediately.
For normal shrinkage cracks, the general advice is to wait until the drying-out period is complete (12 to 18 months), then fill and redecorate. There is little point in filling cracks at six months, as new ones are likely to appear and existing ones may widen before the settling process is complete. When you do fill them, use a flexible filler rather than a rigid one — flexible fillers can accommodate slight future movement without cracking again. Brands like Toupret TX110 Interior Flexible Filler (approximately £8 to £12 per tube) or Polycell SmoothOver Crack-Free Ceiling (around £15 for 2.5 litres) are well-suited to this purpose.
What Voids Your NHBC Warranty — And What Doesn't
Your new build home almost certainly comes with a 10-year structural warranty, most commonly provided by the NHBC (National House Building Council), though alternatives include LABC Warranty, Premier Guarantee, and Checkmate. Understanding what actions void or affect your warranty is critical before making any changes to your home.
Changes That Will Void or Affect Your Warranty
Removing or altering load-bearing walls is the most significant change that will void your structural warranty. Even partial removal of a load-bearing wall without proper engineering calculations and building regulations approval will invalidate the structural warranty on the affected area. If you are considering opening up your kitchen-diner or creating an open-plan living space, you must obtain structural engineer calculations, building regulations approval from your local authority, and ideally notify your warranty provider before commencing work. The cost of removing a load-bearing wall professionally, including a steel beam (RSJ), building control sign-off, and making good, typically ranges from £2,500 to £5,000 depending on the span.
Altering the plumbing system beyond simple like-for-like replacements can affect your warranty. This includes moving radiators, rerouting pipework, adding extra bathrooms, or changing the boiler. If your home has a heat pump system (increasingly common in new builds from 2025 onwards under Part L building regulations), any modifications to the heating system should be carried out by an MCS-certified installer to maintain both the warranty and any government grants you may have received.
Electrical alterations that go beyond simple changes (swapping light fittings, adding plug sockets on an existing ring main) require Part P certification. Adding new circuits, moving your consumer unit, or carrying out any work in bathrooms or kitchens requires sign-off by a qualified electrician registered with a competent person scheme (such as NICEIC, NAPIT, or ELECSA). Uncertified electrical work will void warranty coverage for that area of the home and can also create problems when you come to sell.
Modifying the roof structure — including cutting into roof trusses to create loft storage or a loft conversion — voids your structural warranty unless properly engineered and approved. This is a particularly important point because many new build owners want to convert their loft space, but cutting truss rafters without structural engineering support is both dangerous and a warranty breach.
External alterations such as rendering over brickwork, adding external insulation, or changing the external cladding can affect your warranty because they change the thermal and moisture performance of the building envelope. Similarly, blocking or modifying airbricks, ventilation pathways, or weep holes in cavity walls can cause damp issues and void related warranty claims.
Adding conservatories, extensions, or porches that connect to the original structure will require your warranty provider to be notified and will need building regulations approval. The warranty may still cover the original structure, but the extension itself will not be covered unless it has its own structural warranty.
Changes That Are Safe and Will Not Void Your Warranty
The good news is that a great many personalisation changes are perfectly safe and will not affect your warranty in any way:
Painting walls and ceilings in any colour is fine. Hanging wallpaper is fine (though ideally wait for the drying-out period to complete). Installing shelving with wall plugs and screws is fine, provided you check for hidden cables and pipes using a stud finder/cable detector first. Changing light fittings on a like-for-like basis (e.g., swapping a pendant for a different pendant using the existing ceiling rose) is fine and does not require Part P certification. Fitting curtain poles or blinds is fine. Replacing door handles and other ironmongery is fine. Changing taps on a like-for-like basis is fine. Installing a new kitchen worktop is fine. Replacing the kitchen splashback is fine. Laying new flooring over the existing subfloor — whether carpet, laminate, engineered wood, or luxury vinyl tile (LVT) — is fine.
The general principle is that cosmetic changes are always safe, while structural, mechanical, or electrical changes require care, certification, and potentially notification to your warranty provider.
Developer Restrictions During the Defects Period
Separate from your 10-year structural warranty, most developers provide a defects liability period — typically the first two years after completion — during which the developer is responsible for rectifying any construction defects. During this period, there are some practical considerations to keep in mind regarding decorating and modifications.
If you make significant changes to an area of the home during the defects period, the developer may argue that your modifications caused or contributed to any defects that subsequently appear. For example, if you retile the bathroom with different tiles and the shower tray later develops a leak, the developer may dispute whether the leak was a construction defect or was caused by your tiling work. Similarly, if you paint over cracks without reporting them during the defects period, the developer may later argue that the cracks were cosmetic and should have been reported before you covered them up.
The practical advice is to document everything before you start decorating. Take dated photographs of every room, noting any defects, cracks, or snags. Report all defects to your developer through the proper channels (usually via their customer care portal or email) within the defects period, even if you plan to fix cosmetic issues yourself later. This creates a paper trail that protects you if larger issues emerge down the line.
Some developers include specific clauses in their contracts about modifications during the defects period. It is worth reading your purchase contract carefully and, if in doubt, contacting your developer's customer care team to confirm that planned changes will not affect your defects cover.
What You Can Do Immediately After Moving In
Despite all the cautions about the drying-out period and warranty considerations, there is a great deal you can do to personalise your new build home from day one. Here is a comprehensive list of safe, immediate changes:
Window treatments: Hanging curtains and blinds is one of the most impactful immediate changes. New build windows are typically delivered without any window treatments, meaning you have no privacy and no light control. Curtain poles or tracks can be fitted to the wall or ceiling above windows using appropriate fixings. For a modern look, consider ceiling-mounted curtain tracks (such as the Silent Gliss range, from approximately £80 per window), which give a clean, streamlined appearance. Roller blinds are a cost-effective alternative, with made-to-measure options from companies like Blinds2Go starting at around £30 per window. If you are measuring for blinds or curtains, be aware that new build window reveals are very precise — measure three times and order to the exact millimetre.
Light fittings: Most new builds are handed over with basic pendant fittings — a simple lampholder with a white ceiling rose. Swapping these for decorative pendants, flush ceiling lights, or spotlights (where existing wiring allows) makes a significant difference to the feel of a room. As noted earlier, like-for-like swaps on existing wiring do not require Part P certification. A pendant light change takes approximately 10 minutes per fitting if you are comfortable working with electrics (always switch off at the consumer unit first). Budget around £30 to £150 per fitting depending on your taste, with retailers like Dunelm, John Lewis, and Habitat offering extensive ranges.
Shelving and wall-mounted storage: You can immediately hang shelves, mirrors, picture frames, and wall-mounted storage units. The critical step is to use a cable and pipe detector (available from around £20 at Screwfix or Toolstation) before drilling any holes. New build walls are typically either plasterboard on timber studs or plasterboard on a dot-and-dab system over blockwork. For heavy items (shelves, TVs, mirrors), you need to find studs or use appropriate plasterboard fixings. For plasterboard walls, heavy-duty fixings like GripIt or Corefix are recommended — standard rawlplugs are not sufficient for heavy loads in plasterboard alone.
Door furniture and ironmongery: Swapping cheap chrome door handles for brushed brass, matt black, or satin nickel alternatives is a quick and inexpensive way to elevate the feel of your home. A full set of internal door handles for a three-bedroom house costs between £100 and £400, depending on the quality and finish. Popular choices include the Carlisle Brass Sorrento range (approximately £15 to £25 per pair) and the Zoo Hardware Rosso Maniglie range (approximately £20 to £35 per pair).
Paint: As discussed, you can paint immediately using breathable matt emulsion. Many new build owners tackle painting room by room over the first few weekends, transforming the builder-white walls into something that feels like home.
Soft furnishings: Rugs, cushions, throws, and other soft furnishings are obviously fine to add immediately and are one of the easiest ways to inject personality into a new build home. Area rugs are particularly effective at adding warmth and texture to the standard laminate or tile flooring found in new build living areas.
Room-by-Room Decorating Guide
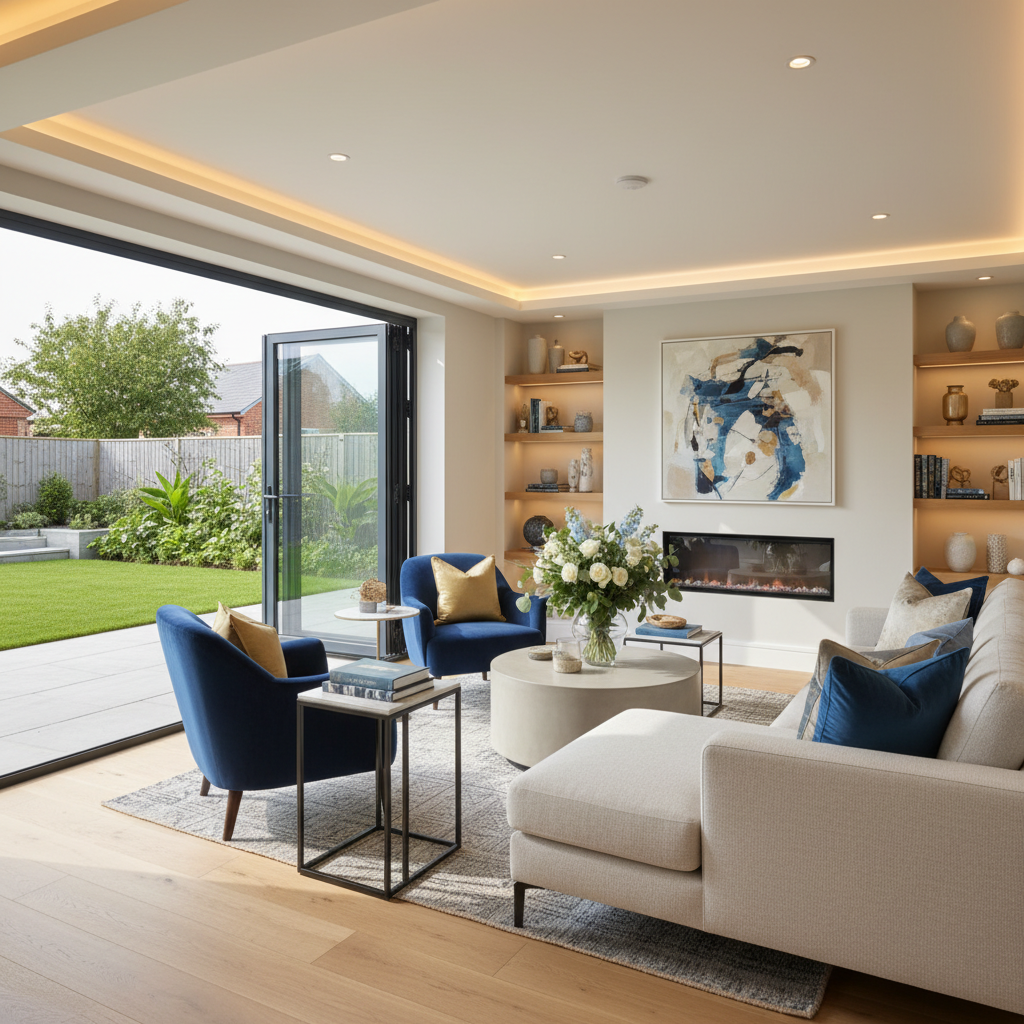
Living Room
The living room is usually the first room new build owners want to tackle, and it offers the most scope for personalisation without any warranty concerns. New build living rooms typically come with painted plaster walls (brilliant white or magnolia), basic carpet or laminate flooring, a single pendant light fitting, a television aerial point, and minimal plug sockets (though new builds from 2024 onwards tend to have more generous socket provision than older properties).
Walls: Start with paint in a breathable matt emulsion. For living rooms, consider warmer neutral tones that add depth without overwhelming the space — greige (grey-beige), warm taupe, sage green, or soft blue-grey are all popular choices for 2025-2026. Feature walls are an effective way to add character without committing to a bold colour throughout; consider painting one wall in a deeper shade or, after the drying-out period, adding textured wallpaper or wood panelling. Half-height wall panelling (also called wainscoting or tongue-and-groove panelling) is enormously popular in new builds and costs approximately £15 to £30 per square metre for MDF panels, or you can buy full panel kits from retailers like The Wall Panelling Company for around £200 to £400 per wall.
Flooring: If your living room has builder-grade carpet, you may want to upgrade to something more durable and attractive. The most popular flooring choices for new build living rooms in 2025 are luxury vinyl tile (LVT), engineered wood, and premium carpet. LVT from brands like Karndean (£40 to £60 per square metre including fitting), Amtico (£50 to £80 per square metre), or more affordable options like Quick-Step Livyn (£25 to £35 per square metre) offers excellent durability, water resistance, and a realistic wood or stone appearance. Engineered wood flooring ranges from £30 to £70 per square metre depending on the species and quality, with fitting adding £10 to £15 per square metre. Premium carpets from ranges like Cormar or Victoria Carpets cost £25 to £50 per square metre including fitting.
Lighting: Replace the standard pendant with a statement fitting that reflects your style. For larger living rooms, consider multiple light sources: a central pendant or flush light supplemented by table lamps, floor lamps, and perhaps LED strip lighting behind shelving or under floating shelves. If you want recessed downlights (spotlights), this requires new wiring and should be carried out by a qualified electrician, costing approximately £80 to £120 per downlight installed.
Media wall: The media wall trend — a full wall unit incorporating a mounted TV, electric fireplace, shelving, and ambient lighting — has been one of the biggest living room trends in new builds. A bespoke fitted media wall costs between £1,500 and £5,000 depending on complexity, materials, and the cost of the electric fire. DIY media walls using IKEA BESTA units as a base are a popular budget-friendly alternative, with total costs of around £500 to £1,200. If you are mounting a TV, ensure you use appropriate fixings for your wall type (plasterboard, block, or timber stud) and that the bracket is rated for your TV's weight.
Kitchen
New build kitchens vary enormously depending on your developer and the price point of the property. Budget new builds may come with basic laminate worktops, standard white or cream units, and builder-grade appliances. Higher-end developers like Redrow, David Wilson, or Cala Homes typically offer more premium kitchen specifications with quartz worktops, integrated appliances, and soft-close hinges as standard.
Immediate changes: Replacing the kitchen splashback is one of the most cost-effective improvements. Many developers install a basic glass or tile splashback behind the hob, but you can upgrade to a more attractive option. Full-wall tiled splashbacks cost approximately £30 to £80 per square metre for tiles plus £150 to £300 for fitting. Alternatively, acrylic splashback panels or glass panels with printed designs start from around £100 and can be self-installed.
Worktop upgrade: If your developer supplied laminate worktops, upgrading to quartz or granite is a popular change. Expect to pay £2,500 to £5,000 for quartz worktops in a standard three-bedroom kitchen, including templating, cutting, and fitting. Brands like Silestone, Caesarstone, and Quarella are widely available through kitchen specialists and national chains like Magnet and Howdens.
Cabinet doors: Rather than replacing the entire kitchen, you can transform the appearance by replacing just the cabinet doors and drawer fronts. Companies like Plykea, Husk Kitchens, and Naked Doors specialise in replacement doors for standard kitchen carcasses, allowing you to upgrade to Shaker-style, handleless, or fluted designs. This approach typically costs £1,500 to £3,500 for a full kitchen — significantly less than a complete kitchen replacement.
Handles and hardware: Simply changing cabinet handles from the developer's standard chrome bar handles to something more distinctive — cup handles, knurled knobs, leather pull handles, or matt black T-bar handles — costs between £100 and £300 for a full kitchen and takes an afternoon to complete.
Under-cabinet lighting: LED strip lighting or puck lights under wall cabinets add both task lighting and atmosphere. Plug-in LED strip kits start from about £15 to £30 and require no electrical work — they simply plug into an existing socket behind the cabinets. Hardwired under-cabinet lighting provides a cleaner installation but requires an electrician and costs around £200 to £400.
Bedrooms
New build bedrooms typically come with painted walls, basic carpet, a single pendant light, and minimal built-in storage (if any). The master bedroom in most new builds from major developers will have an en-suite bathroom, while second and third bedrooms share a family bathroom.
Walls: Bedrooms are an ideal place to be bolder with colour, as they are private spaces. Deep navy, dark green, dusty pink, or warm terracotta feature walls behind the bed are popular choices. Consider combining paint with wall panelling behind the headboard — vertical slat panels (also called fluted or reeded panels) are a strong trend for 2025-2026. These can be purchased as MDF panel kits from around £150 to £300 per wall, or you can create a DIY version using timber battens from your local timber merchant for around £50 to £100 in materials.
Storage: New builds are notorious for limited storage, particularly in bedrooms. Built-in wardrobes are one of the most worthwhile investments in a new build home. Bespoke fitted wardrobes from companies like Sharps, Hammonds, or Neville Johnson cost between £2,000 and £6,000 per room, depending on size and specification. More affordable alternatives include IKEA PAX wardrobes (which can be customised and fitted to look built-in for around £500 to £1,500 per room) or using companies like Tylko or Neatsmith that offer modular, customisable solutions at mid-range prices.
Lighting: Bedrooms benefit from layered lighting. Replace the single pendant with a statement light fitting, and add bedside table lamps or wall-mounted reading lights. Pendant lights from brands like Pooky, Habitat, or West Elm can transform the feel of a bedroom for £50 to £200. Wall-mounted swing-arm reading lights (such as the Astro Enna range, approximately £100 to £150 each) require hardwiring and electrician installation but free up bedside table space and add a boutique-hotel feel.
Flooring: Upgrading bedroom carpet is a worthwhile investment if the developer-supplied carpet is thin and basic. A good quality bedroom carpet with an equally good underlay costs approximately £25 to £45 per square metre including fitting. Alternatively, engineered wood or LVT flooring with a large area rug provides a more contemporary look.
Bathrooms
Bathrooms in new builds are typically finished to a reasonable standard but with conservative styling — white sanitaryware, chrome fittings, and basic tiling. The scope for change depends on whether you want cosmetic improvements or a full refurbishment.
Cosmetic changes (safe during defects period): Replacing bathroom accessories — towel rails, toilet roll holders, soap dishes, and robe hooks — is quick and inexpensive. Upgrading from chrome to brushed brass or matt black creates a significant visual impact for under £100. New bath panels (from around £30 to £80) can update the look of a standard bath. Replacing the bathroom mirror with a larger, illuminated cabinet or a decorative framed mirror is another easy upgrade.
Tiling: Adding additional tiling (e.g., tiling the full height of a wall rather than just the splash zone) is a popular improvement. However, be cautious about retiling during the defects period, as it may affect your ability to claim for waterproofing or drainage defects. If you do retile, photograph the original tiling thoroughly first and ensure any new tiling is properly waterproofed with tanking membrane behind it.
Shower upgrades: Many new builds come with basic mixer showers or thermostatic bar showers. Upgrading to a rainfall showerhead, a digital shower system (such as Mira Activate or Aqualisa Quartz), or a more premium shower panel is a relatively straightforward change. A plumber can swap a basic shower for a digital system in half a day, with costs of approximately £400 to £800 for the unit plus £150 to £250 for installation.
Full bathroom refurbishment: If you want to completely change the bathroom layout, sanitaryware, or tiling, this is a significant project that is best left until after the defects period. A full bathroom refurbishment costs between £5,000 and £12,000 for a standard family bathroom, including new sanitaryware, tiling, flooring, and all plumbing and electrical work.
Hallway and Stairs
The hallway is the first space anyone sees when entering your home, yet in new builds, it is often one of the most neglected areas. Typical new build hallways feature white walls, basic carpet on the stairs, and a single pendant light.
Stair runner: Replacing the builder-grade stair carpet with a statement stair runner over painted or stained treads is one of the most transformative changes you can make in a new build. A quality stair runner (from brands like Roger Oates, Alternative Flooring, or Crucial Trading) costs between £500 and £1,500 for a typical straight flight, including stair rods and fitting. A more budget-friendly approach is to remove the carpet, sand and paint the treads in a durable floor paint (such as Farrow & Ball Floor Paint, approximately £65 per 2.5 litres), and add a runner from a high-street retailer.
Under-stair storage: Many new build under-stair cupboards are basic — just a door and an empty space. Customising this space with fitted shelving, pull-out drawers, or a built-in desk maximises its utility. Bespoke under-stair storage solutions typically cost £500 to £2,000 depending on complexity.
Wall panelling: Hallway wall panelling — particularly Jacobean-style panelling (grid pattern) or board and batten — is extremely popular in new builds and costs between £200 and £600 for a typical hallway, including MDF panels, adhesive, and paint.
Flooring Options and Costs: A Comprehensive Comparison
Flooring is one of the biggest decisions — and biggest expenses — when decorating a new build home. Here is a detailed comparison of the most popular options, with realistic 2025-2026 UK prices including fitting:
Builder-grade carpet (already installed): The carpet supplied by your developer is typically an 80/20 wool-nylon blend or a basic polypropylene carpet with a thin underlay. It is functional but rarely luxurious. If you are happy with carpet but want better quality, budget for a replacement within the first year or two.
Premium carpet: £25 to £50 per square metre fitted, including quality underlay. A three-bedroom house with carpet throughout the bedrooms, stairs, and landing (approximately 50 to 60 square metres) would cost £1,250 to £3,000. Recommended brands include Cormar Carpets (excellent UK-made range), Victoria Carpets, and Adam Carpets.
Laminate flooring: £15 to £35 per square metre fitted. Laminate offers a wood-look finish at a lower cost than engineered wood, but the best laminates (Quick-Step Impressive, Egger Pro) are increasingly hard to distinguish from real wood. Budget approximately £1,000 to £2,500 to laminate the ground floor of a three-bedroom house (approximately 40 to 50 square metres of living space).
Luxury Vinyl Tile (LVT): £25 to £60 per square metre fitted. LVT is the dominant flooring choice in new builds for 2025, offering exceptional durability, water resistance, realistic appearance, and comfort underfoot. Karndean, Amtico, and Quick-Step Livyn are the market leaders, while more budget-friendly options like Lifestyle Floors and Moduleo offer good quality at lower prices. Budget £1,500 to £4,000 for ground-floor LVT in a three-bedroom house.
Engineered wood flooring: £30 to £80 per square metre fitted. Engineered wood provides the warmth and authenticity of real wood with greater dimensional stability than solid wood (important in a new build where moisture levels are still settling). Popular species include oak, walnut, and ash. Budget £2,000 to £5,000 for ground-floor engineered wood in a three-bedroom house. Recommended suppliers include Woodpecker, V4 Wood Flooring, and Havwoods.
Porcelain or ceramic tiles: £40 to £100 per square metre fitted, including adhesive, grout, and levelling compound. Tiles are ideal for kitchens, bathrooms, hallways, and utility rooms. Large-format porcelain tiles (600x600mm or 600x1200mm) in concrete or marble effects are popular choices. Budget £2,000 to £6,000 for tiling the ground floor of a three-bedroom house.
Solid wood flooring: £50 to £120 per square metre fitted. While beautiful, solid wood is generally not recommended for new build homes during the drying-out period because it is highly sensitive to moisture and humidity changes. The fluctuating moisture levels in a new build can cause solid wood to expand, cup, or gap. If you have your heart set on solid wood, wait at least 18 months and ensure humidity levels have stabilised before installation.
Developer Upgrades vs DIY: What's Worth Paying for at Reservation Stage
Most new build developers offer a menu of upgrades that you can select when you reserve your plot, usually with a deadline before construction reaches a certain stage. These upgrades are added during the build process and the cost is typically added to your purchase price (and therefore covered by your mortgage). The key question is: which upgrades offer good value, and which are better done yourself after moving in?
Upgrades Worth Paying for Through the Developer
Upgraded kitchen worktops (quartz or granite): Having quartz worktops installed during construction is significantly cheaper than retrofitting them, because the worktops are templated and fitted before the kitchen is fully installed. Developer upgrade prices for quartz worktops typically range from £1,500 to £3,000, whereas retrofitting them after completion costs £2,500 to £5,000 because the existing worktops must be removed and the new ones templated and fitted around an already-installed kitchen.
Upgraded bathroom tiling (full height): Having walls fully tiled during construction is much easier and cheaper than retiling after the build. Developer upgrade prices for full-height tiling are typically £500 to £1,500 per bathroom, whereas doing this yourself after completion would cost £1,500 to £3,000 per bathroom once you account for the cost of removing existing tiles, making good the walls, and retiling.
Electrical upgrades (additional sockets, recessed lighting, outdoor power): Electrical work is always easier and cheaper during construction than after. Having additional sockets, recessed ceiling spotlights, outdoor power points, or pre-wiring for wall-mounted TVs done during the build typically costs £100 to £300 per addition, whereas retrofitting each of these after completion costs two to three times as much due to the need to chase cables into finished walls and make good afterwards.
Underfloor heating: If your developer offers underfloor heating as an upgrade, this is almost always worth taking. Underfloor heating is vastly easier to install during construction (before the screed is laid) and costs approximately £1,500 to £3,000 as a developer upgrade. Retrofitting underfloor heating after completion is either prohibitively expensive (requiring the floor to be lifted and relaid) or limited to electric mat systems that have higher running costs.
Bi-fold or sliding doors: Upgrading from a standard patio door to bi-fold or sliding doors is a structural change that must be done during construction, as it involves widening the opening and installing a steel lintel. Developer upgrade prices range from £2,000 to £5,000. This change is impossible to make after completion without major structural work costing £8,000 to £15,000 or more.
Upgrades Not Worth Paying for Through the Developer
Paint colours: Most developers charge £200 to £500 for choosing non-standard wall colours, and the range is usually limited. You can paint your entire home yourself for the same cost using exactly the colours you want.
Carpet upgrades: Developer carpet upgrades are often poor value. They may charge £500 to £1,500 for an upgraded carpet, but you could get a significantly better carpet from a local independent carpet retailer for the same or less money.
Light fittings: Developer light fitting upgrades are typically overpriced for what you get. You can choose from an enormously wider range of fittings at better prices by buying and installing them yourself after moving in.
Kitchen splashbacks: The developer's splashback options are usually limited and marked up significantly. Buying and fitting your own splashback after completion gives you far more choice at a comparable or lower cost.
Turf and landscaping: Developer garden packages are almost always poor value. The turf is often thin and laid on substandard soil, and the landscaping is minimal. You will get a far better garden by doing it yourself or hiring a local landscaper after completion — see our comprehensive guide on new build garden setup for details.
Storage Solutions for New Builds
One of the most common complaints about new build homes is a lack of storage. Modern new builds are designed to maximise the number of sellable rooms within a given footprint, which often means that storage space is sacrificed. Hallway cupboards are small, bedrooms rarely have built-in wardrobes, and utility rooms (if present) are compact. Here are practical storage solutions for every area of a new build home:
Hallway: If your hallway has an under-stair cupboard, customise it with fitted shelving, hooks, and pull-out shoe racks to maximise its utility. Companies like Wickes and IKEA offer modular storage systems that can be adapted to the triangular under-stair space. Wall-mounted coat hooks or a hallway bench with shoe storage underneath are also effective for keeping the entrance tidy.
Bedrooms: Built-in wardrobes are the single most effective storage improvement in a new build bedroom. As mentioned earlier, costs range from £500 (IKEA PAX system, self-assembled) to £6,000 (bespoke fitted wardrobes). For children's bedrooms, cabin beds with integrated desk and storage underneath are an excellent space-saving solution, with prices from about £300 to £800.
Kitchen: Maximise existing cabinet space with internal organisers — pull-out wire baskets, spice rack inserts, pan lid holders, and under-shelf baskets. Brands like Joseph Joseph, Simplehuman, and Rev-A-Shelf offer excellent kitchen organisers. A ceiling-mounted pot rack is another option that frees up cabinet space while adding a decorative element.
Bathroom: Wall-mounted cabinets, over-toilet storage units, and shower caddies help manage storage in typically compact new build bathrooms. A mirrored wall cabinet (replacing the developer's basic mirror) adds storage while maintaining the room's appearance.
Loft: Most new build lofts can be boarded for storage, but take care: you must not compress the loft insulation (which reduces its effectiveness) and you must not cut or modify roof trusses (which voids your structural warranty). The solution is to use loft legs — raised platforms that sit above the insulation and provide a stable surface for boarding. A professional loft boarding service costs approximately £500 to £1,000 for a standard three-bedroom house. A loft ladder to provide access costs an additional £150 to £300 installed.
Garage: If you have a garage, wall-mounted racking systems, ceiling-mounted storage platforms, and tool organiser panels can transform a cluttered garage into an efficient storage space. GarageTek and Garageflex are specialist companies offering comprehensive garage storage solutions, with full-garage installations costing approximately £2,000 to £5,000.
Budget Guide: How Much Does It Cost to Decorate a Full New Build Home?
One of the biggest surprises for new build buyers is how much it costs to turn a new house into a home. Below are realistic budget breakdowns for decorating a typical three-bedroom new build house in the UK in 2025-2026, across three budget levels:
Budget Level: Essential Only (£3,000 to £6,000)
This level covers the basics needed to make your home comfortable and personal without major upgrades:
Paint for all rooms (breathable emulsion): £200 to £400. Curtains or blinds for all windows: £500 to £1,000. Light fittings (replacing basic pendants): £200 to £500. Door handles (upgraded ironmongery): £100 to £300. Bathroom accessories: £50 to £150. Hallway storage and hooks: £100 to £300. Soft furnishings (rugs, cushions, throws): £300 to £800. Basic shelving and wall decor: £200 to £500. Dehumidifier: £150 to £300. Total: approximately £1,800 to £4,250, allowing headroom for unexpected costs.
Mid-Range Level: Comfortable Personalisation (£8,000 to £18,000)
This level includes flooring upgrades, kitchen improvements, and built-in storage:
Everything in the essential level: £2,000 to £4,000. Flooring upgrade (LVT or engineered wood ground floor, upgraded carpet bedrooms): £3,000 to £7,000. Kitchen improvements (splashback, handles, under-cabinet lighting): £500 to £1,500. Built-in wardrobes for master bedroom: £1,000 to £3,000. Wall panelling (hallway and/or living room): £300 to £800. Stair runner or upgraded stair carpet: £500 to £1,500. Downlights installation (living room and kitchen): £500 to £1,500. Under-stair storage customisation: £300 to £800. Total: approximately £8,100 to £20,100.
Premium Level: Full Personalisation (£25,000 to £50,000+)
This level represents a comprehensive personalisation including premium materials and bespoke elements:
Everything in the mid-range level: £10,000 to £18,000. Premium flooring throughout (Karndean/Amtico LVT or Havwoods engineered wood): £5,000 to £10,000. Kitchen worktop upgrade to quartz: £2,500 to £5,000. Kitchen door replacement (Plykea or similar): £1,500 to £3,500. Bathroom refurbishment (en-suite and/or family bathroom): £5,000 to £12,000. Bespoke fitted wardrobes for all bedrooms: £4,000 to £12,000. Media wall in living room: £1,500 to £5,000. Premium wallpaper and decorating (Farrow & Ball, Morris & Co): £2,000 to £5,000. Smart home additions: £1,000 to £3,000. Garden landscaping: £3,000 to £10,000. Total: approximately £35,500 to £83,500.
These figures may seem daunting, but remember that you do not need to do everything at once. Many homeowners spread their decorating over two to three years, tackling the most impactful changes first (paint, curtains, flooring) and leaving bigger projects (bathroom refurbishment, fitted wardrobes, garden landscaping) for later when budgets have recovered from the initial purchase costs.
Dealing with Builder-White Walls: Making Magnolia Work (or Replacing It Entirely)
The overwhelming whiteness of a new build interior is one of the first things new owners notice — and one of the first things they want to change. Every wall, every ceiling, every door frame is the same shade of brilliant white or magnolia, creating a clinical, impersonal atmosphere that bears no resemblance to the beautifully staged showhome you fell in love with.
If you want to live with the white walls temporarily (perhaps while saving up for a full decorating project), there are ways to make them feel less stark. Large artworks and gallery walls add colour and interest without painting. Colourful soft furnishings — bold rugs, patterned cushions, vibrant throws — create focal points against the neutral backdrop. Plants add life and colour: trailing plants on shelves, a large fiddle-leaf fig or monstera in a corner, or a collection of succulents on a windowsill. Warm-toned wood furniture (oak, walnut, or teak) adds warmth that counteracts the coldness of white walls.
When you are ready to add colour, start with a colour scheme and plan the whole house cohesively rather than choosing each room in isolation. A good approach is to select two or three complementary base colours and use them consistently throughout the house, with accent colours in individual rooms. For example, a warm white (such as Dulux White Mist or Farrow & Ball Pointing) for ceilings and woodwork, a soft warm neutral (such as Dulux Perfectly Taupe or Farrow & Ball Elephant's Breath) for main living areas, and a deeper accent colour (such as Dulux Sapphire Salute or Farrow & Ball Hague Blue) for feature walls and smaller rooms. This creates a sense of flow and cohesion as you move through the house.
When to Get a Professional Decorator In
There is no shame in hiring a professional decorator, and in many cases, it is the most cost-effective approach when you factor in time, quality of finish, and the cost of correcting DIY mistakes. Here is a guide to when professional help is worthwhile:
Hire a professional if: you want wallpaper hung (wallpapering is a skill that takes years to master, and mistakes are costly and visible); you have high ceilings or stairwells that are difficult to reach safely; you want a premium, flawless paint finish (professionals can achieve a finish that most DIY painters cannot); you are short on time and want multiple rooms completed quickly; you are using expensive paint or wallpaper and cannot afford to waste it on mistakes.
DIY is fine if: you are painting simple, accessible walls and ceilings with emulsion; you are confident with a roller and brush and have experience of cutting in around edges; you are hanging shelves, pictures, or simple fixtures; you are painting previously painted surfaces in a similar colour (minimal preparation needed).
Professional decorator costs in 2025-2026: A professional decorator in the UK charges approximately £150 to £300 per day (rates vary significantly by region — London and the South East are at the higher end, while the North and Midlands are more affordable). As a rough guide: painting a standard bedroom (walls and ceiling) takes one to one and a half days; painting a living room takes one and a half to two days; wallpapering a feature wall takes half a day to a full day; painting a hallway and stairwell takes two to three days. For a full three-bedroom house (all rooms painted), expect to pay approximately £2,000 to £4,000 for labour, plus the cost of paint and materials.
Common Mistakes When Decorating a New Build
Learning from others' mistakes can save you time, money, and frustration. Here are the most common decorating mistakes made by new build homeowners:
Mistake 1: Using non-breathable paint or wallpaper during the drying-out period. As discussed extensively above, trapping moisture behind non-breathable finishes causes damp, mould, and peeling. Stick to breathable matt emulsion for the first 12 to 18 months.
Mistake 2: Filling cracks too early. If you fill and paint over shrinkage cracks at three months, they will almost certainly reappear. Wait until the drying-out period is substantially complete before doing a comprehensive fill-and-redecorate.
Mistake 3: Not using a cable and pipe detector before drilling. New build walls contain electrical cables and water pipes in locations that are not always obvious. A single drilled hole through a water pipe or electrical cable can cause hundreds or thousands of pounds of damage. Always use a detector before drilling. Always.
Mistake 4: Choosing paint colours under artificial light only. Paint colours look dramatically different under natural daylight versus artificial light, and they look different on a north-facing wall versus a south-facing wall. Always test paint colours on the actual wall in the actual room, and observe them at different times of day before committing. Most paint brands offer sample pots (approximately £2 to £5) or peel-and-stick colour swatches.
Mistake 5: Underestimating the total cost. As the budget guide above illustrates, decorating a new build to a comfortable standard easily runs into five figures. Plan your budget carefully and prioritise the changes that will have the most impact on your daily life.
Mistake 6: Trying to replicate the showhome exactly. Developers spend £30,000 to £80,000 staging a showhome. The furniture is often custom-sized (slightly smaller than standard to make rooms look bigger), the accessories are professionally curated, and the overall effect is designed to sell houses rather than to be lived in. Take inspiration from the showhome, but create a home that works for your actual life, not a showpiece.
Mistake 7: Ignoring the importance of lighting. Lighting is one of the most overlooked aspects of interior design. A room with a single, harsh overhead light will never feel as warm and inviting as the same room with layered lighting — ambient, task, and accent. Budget for good lighting and treat it as a priority rather than an afterthought.
For more guidance on settling into your new build, do not miss our guide to common mistakes first-time buyers make with new builds, and for ongoing care, read our comprehensive new build home maintenance tips.
Final Thoughts: Enjoy the Process
Decorating a new build home is a marathon, not a sprint. The drying-out period, the warranty considerations, and the sheer cost of furnishing and decorating mean that most people take two to three years to get their home exactly how they want it — and that is perfectly normal. The key is to understand the constraints (breathable paint, no structural changes without approval, patience with cracks and settlement), prioritise the changes that will make the biggest difference to your daily comfort, and enjoy the process of gradually turning your new house into a home that reflects your personality and style.
Start with the quick wins — paint, curtains, light fittings, and soft furnishings — and work towards the bigger projects as your budget and the drying-out timeline allow. Take photographs as you go, because looking back at the transformation from builder-white to beautifully personalised is one of the most satisfying aspects of new build ownership.