How Developer Upgrades Work
Every major UK housebuilder — Barratt Homes, Taylor Wimpey, Persimmon, Bellway, Redrow, David Wilson, and many regional developers — runs a structured choices and selections process. Understanding this process helps you prepare properly and avoid missing critical deadlines.
The Step-by-Step Process
The upgrade journey typically follows a clear sequence from reservation through to completion. Knowing what happens at each stage means you can research options in advance and arrive at your choices appointment fully prepared.
- Reserve your plot — pay a reservation fee (usually £500–£1,000) and receive your welcome pack with house-type specifications.
- Receive your choices brochure — a detailed document listing every available upgrade for your specific house type, with prices and images.
- Attend the choices appointment — a one-to-three-hour session at the developer’s design studio or sales office where you see and touch materials, compare finishes, and discuss options with a dedicated choices coordinator.
- Confirm structural and first-fix selections — electrical layouts, plumbing additions, and any internal layout changes must be confirmed before the first-fix stage begins on your plot.
- Confirm second-fix selections — kitchen units, worktops, tiles, flooring, sanitaryware, and fittings are locked in before second-fix trades arrive.
- Pay for upgrades or add to purchase price — settle the upgrade costs either as a lump sum or by adding them to your mortgage.
- Quality check at handover — inspect all installed upgrades during your home demonstration and note anything on the snagging list.
What Is Typically Included Free as Standard
Before spending on upgrades, it helps to know what most UK developers already include in the base specification. The standard package is generous and provides a fully functional, move-in-ready home.
- Fitted kitchen: base and wall units, laminate worktop, stainless steel sink and mixer tap, integrated oven, ceramic hob, extractor hood, and usually an integrated fridge-freezer
- Bathroom suite: bath or shower (or both), pedestal basin, close-coupled WC, basic chrome taps, and ceramic wall tiles to the splash zone
- Central heating: gas or electric boiler, radiators throughout, and a programmable thermostat
- Electrics: a regulation-compliant number of double sockets, pendant light points in every room, and a consumer unit with RCD protection
- Flooring: a basic twist-pile carpet in neutral tones to bedrooms, stairs, and landing (ground-floor hard flooring is sometimes included, sometimes not)
- External: turfed or seeded rear garden, basic boundary fencing, a paved path to the front door, and a tarmac or block-paved driveway
- Decoration: magnolia or white emulsion throughout, white gloss to woodwork, and chrome ironmongery
Everything listed above comes at no extra cost. Upgrades build on this solid foundation, and understanding the baseline helps you judge whether a particular upgrade represents good value or whether the standard specification already meets your needs. For more on the overall buying process, see our guide to the new build buying process.
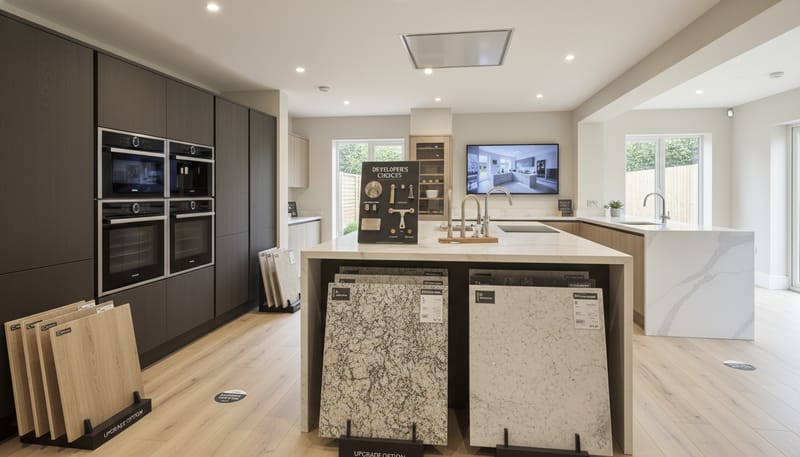
Kitchen Upgrades
The kitchen is where developer upgrades deliver the most visible transformation. A standard new build kitchen is perfectly functional, but the upgrade options let you move from “good” to “genuinely impressive” — and many kitchen upgrades are significantly cheaper through the developer than retrofitting after completion.
The master table below compares every common kitchen upgrade, showing what you would pay through the developer versus what it costs to retrofit independently after you move in. The savings column reveals why kitchen upgrades are among the smartest investments you can make at the choices appointment.
| Kitchen Upgrade | Developer Cost | Retrofit Cost | Typical Saving | Verdict |
|---|---|---|---|---|
| Quartz worktops (Silestone / Caesarstone) | £1,500–£4,000 | £2,500–£6,000 | 30–40% | Always choose |
| Cabinet door style upgrade (shaker / handleless) | £400–£2,500 | £3,000–£8,000 (full refit) | 60–70% | Always choose |
| Boiling water tap (Quooker Fusion / Flex) | £1,100–£1,800 | £1,400–£2,200 | 15–25% | Consider |
| Induction hob upgrade | £200–£600 | £350–£800 | 30–40% | Always choose |
| Integrated microwave (combination oven) | £300–£600 | £400–£750 | 20–30% | Consider |
| Wine cooler (integrated under-counter) | £400–£800 | £500–£900 | 10–20% | Consider |
| American fridge-freezer housing | £500–£1,200 | £1,200–£2,500 (unit modification) | 50–60% | Always choose if wanted |
| Kitchen island plumbing and electrical prep | £300–£800 | £1,500–£3,500 (floor up) | 70–80% | Always choose |
| Utility room plumbing (washer / dryer) | £400–£800 | £800–£1,800 | 50–55% | Always choose |
| Under-cabinet LED lighting | £150–£400 | £250–£600 | 30–40% | Consider |
The standout upgrades from the table above are quartz worktops, cabinet door style changes, and kitchen island prep. These three items involve work that integrates into the build programme at precisely the right stage — before floors are screeded, before units are fitted, and before worktops are templated. Doing any of them after completion means ripping out materials that have already been installed, which is wasteful and expensive.
Questions to Ask About Kitchen Upgrades
- What brand of quartz is offered? Silestone and Caesarstone are premium choices; some developers offer more affordable engineered stone that still performs well.
- Can I upgrade just the worktop and keep the standard cabinets? This lets you focus your budget on the most impactful change.
- Is the boiling water tap price all-inclusive? Confirm it includes the under-counter tank, filter, installation, and connection — not just the tap unit.
- Does the induction hob upgrade include the correct electrical supply? Induction hobs draw more power than ceramic hobs and may need a dedicated circuit.
- What is the deadline for kitchen selections? Kitchen choices typically need to be confirmed 8–12 weeks before second-fix begins.
- Are there package deals? Many developers offer bundled kitchen upgrade packages at a 10–20% discount compared with choosing items individually.
For design inspiration and layout ideas, see our guide to new build kitchen design.
Flooring Upgrades
Having flooring laid before you move in is one of the biggest practical benefits of developer upgrades. There is no living on bare subfloor, no dust from installation, and no shuffling furniture between rooms while fitters work. Every major developer offers a range of flooring options, and the table below compares the main types available.
| Flooring Type | Developer Cost (per m²) | Best Rooms | Durability | Waterproof | Maintenance |
|---|---|---|---|---|---|
| Standard carpet (twist pile) | Included | Bedrooms, stairs, landing | Moderate | No | Regular vacuuming, occasional deep clean |
| Premium carpet (wool blend) | £15–£40 extra | Bedrooms, living room, stairs | High | No | Same as standard, stain-treat promptly |
| Luxury Vinyl Tile — LVT (Karndean / Amtico) | £30–£60 | Hallway, kitchen, living area, bathrooms | Very high | Yes | Mop and sweep, minimal effort |
| Porcelain floor tiles | £50–£100 | Kitchen, hallway, bathrooms, utility | Extremely high | Yes | Mop, occasional grout cleaning |
| Engineered wood | £45–£85 | Living room, dining room, hallway | High (can be refinished) | No | Sweep, occasional oiling or lacquering |
For most buyers, the winning combination is LVT to the entire ground floor (hallway, kitchen, living and dining areas, cloakroom) paired with premium carpet upstairs. This combination typically costs £2,000–£4,500 as a developer upgrade for a three-bedroom home and creates a cohesive, high-quality feel throughout.
Flooring Selection Tips
- Choose LVT over standard vinyl: LVT from brands like Karndean and Amtico is a genuine premium product — rigid core, realistic texture, and a 20–30 year wear layer. Standard sheet vinyl is a different product entirely.
- Ask for large-format LVT planks: wider, longer planks (e.g., Karndean Korlok range) look more realistic and create a greater sense of space than narrow strips.
- Consider underfloor heating with porcelain tiles: adding electric UFH beneath porcelain costs roughly £40–£70 per m² as a developer upgrade and transforms bathroom and kitchen comfort.
- Request samples to take home: view them in your own lighting, alongside furniture swatches and paint cards, before confirming.
- Check warranty terms: developer-installed flooring is typically covered under the defects period, giving you two years of warranty protection.
- Calculate whole-house costs: some developers offer a whole-house flooring package at a discount of 10–15% compared with selecting rooms individually.
For a deeper look at all the options, see our guide to the best flooring for new builds.
Bathroom Upgrades
Bathrooms are where relatively modest spending creates the most dramatic visual upgrade. The standard specification — a white suite with basic chrome taps and plain ceramic tiles to the splash zone — is functional but unremarkable. A few well-chosen upgrades transform the space into something that feels boutique-hotel quality.
The table below lists every common bathroom upgrade alongside its typical developer cost and how difficult it would be to achieve the same result after you have moved in.
| Bathroom Upgrade | Developer Cost | Impact Level | Retrofit Difficulty |
|---|---|---|---|
| Full-height wall tiling (all walls, premium range) | £400–£1,500 | Transformative | Moderate — messy, requires redecoration |
| Large-format porcelain floor tiles | £250–£800 | High | Moderate — must lift existing floor |
| Wall-hung vanity unit with integrated basin | £300–£800 | High | Moderate — plumbing and wall reinforcement |
| Concealed cistern WC unit | £250–£600 | High | Difficult — requires wall frame and plumbing |
| Frameless glass shower screen | £200–£500 | Moderate | Easy — straightforward retrofit |
| Rainfall shower head with thermostatic valve | £200–£600 | High | Moderate — may need hidden pipework |
| Electric underfloor heating | £300–£700 | High (comfort) | Very difficult — must lift entire floor |
| Heated towel rail upgrade (designer style) | £100–£300 | Moderate | Easy — simple swap |
| Mirror cabinet with LED lighting | £150–£400 | Moderate | Easy — wall mount, electrician for hardwire |
Bathroom Upgrades That Boost Resale Value
- Full-height tiling: creates a polished, finished look that estate agents consistently identify as a selling point — buyers immediately sense quality.
- Vanity unit with storage: practical storage is always valued, and a wall-hung vanity looks significantly more premium than a pedestal basin.
- Concealed cistern WC: the sleek, contemporary appearance signals a high-specification home and is genuinely difficult to retrofit.
- Underfloor heating: a luxury touch that costs relatively little as a developer upgrade but is extremely expensive and disruptive to add later.
- Consistent fixtures throughout: matching tap and shower finishes (brushed brass, matt black, or polished chrome) across all bathrooms creates a cohesive, designer feel.
For space-saving ideas and layout tips, see our guide to maximising space in new builds.
Electrical Upgrades
Electrical upgrades are arguably the single smartest investment you can make through your developer. The reason is simple: once walls are plastered, decorated, and carpeted, adding a new socket or light point means chasing into walls, running cables, making good the plaster, and redecorating — a process that typically costs two to three times more than having the same work done during the build.
The table below lists every common electrical upgrade with developer and retrofit pricing, plus recommended quantities for a typical three-or-four-bedroom home.
| Electrical Upgrade | Developer Cost (each) | After-Completion Cost (each) | Recommended Quantity | Typical Total |
|---|---|---|---|---|
| Additional double socket | £80–£150 | £200–£350 | 6–10 | £480–£1,500 |
| USB-A/C charging socket | £30–£60 (on top of socket) | £50–£90 | 4–6 | £120–£360 |
| Dimmer switch | £20–£50 | £40–£80 | 4–8 | £80–£400 |
| Additional downlight (LED) | £80–£150 | £150–£300 | 4–8 | £320–£1,200 |
| Under-cabinet kitchen lighting | £150–£400 | £250–£600 | 1 (full run) | £150–£400 |
| Outdoor waterproof socket | £100–£200 | £250–£450 | 1–2 | £100–£400 |
| Garden lighting circuit / spur | £150–£350 | £400–£800 | 1 | £150–£350 |
| EV charger prep (dedicated circuit to garage) | £200–£500 | £500–£1,200 | 1 | £200–£500 |
| Cat6 ethernet data point | £80–£150 | £200–£400 | 3–5 | £240–£750 |
| Smart home hub wiring (central cupboard) | £200–£500 | £500–£1,000 | 1 | £200–£500 |
Smart Home Preparation Worth Considering
You do not need to install a full smart home system at the build stage, but having the infrastructure in place costs very little during construction and saves a fortune later. The following preparations are particularly worthwhile.
- Cat6 ethernet to every room: Wi-Fi is convenient, but hardwired connections are faster, more reliable, and essential for serious home offices, gaming, and 4K/8K streaming.
- Centralised network cupboard: a single location (typically under the stairs or in a utility room) where all data cables terminate, making it easy to install a network switch and router.
- Smart lighting circuits: wiring that supports smart switches (neutral wire at the switch plate) costs nothing extra if specified at first-fix and ensures compatibility with systems like Philips Hue, Lutron, and HomeKit.
- EV charger prep: a dedicated 32A circuit from the consumer unit to the garage or driveway costs £200–£500 now versus £500–£1,200 after completion. Even if you do not have an EV today, this is sensible future-proofing.
- External CCTV cable runs: pre-running cable from a central point to key external positions (front door, rear garden, side passage) costs roughly £60–£120 per run and avoids drilling through finished walls later.
For a complete room-by-room lighting plan, see our lighting design guide.
Structural Upgrades
Structural upgrades are changes to the fabric of the building itself — walls, openings, and floor zones. These are the upgrades that are genuinely impossible or prohibitively expensive to do after the house is finished, which makes them worth serious consideration even if they stretch the budget.
- Bi-fold or sliding patio doors: replacing a standard French door with a 3-or-4-panel bi-fold transforms the connection between your kitchen-diner and garden. Developer cost: £2,500–£6,000. Retrofit cost: £4,000–£9,000 (structural lintel, Building Regs, making good).
- Garage conversion preparation: having the garage insulated, a window installed in the blocked-up door opening, and heating/electrics extended into the space. Developer cost: £5,000–£12,000 for a full conversion; £1,500–£3,000 for prep-only (insulation, electrics, plasterboard lining).
- Additional downstairs WC: if your house type does not include a ground-floor cloakroom as standard, adding one during construction is vastly simpler than retrofitting. Developer cost: £2,000–£5,000.
- Wider internal doorways: useful for wheelchair access or simply a more open feel. Must be specified before the frame goes up. Developer cost: £200–£500 per opening.
- Stud wall removal or repositioning: open-plan layouts (removing the wall between kitchen and dining room, for example) are straightforward during construction but expensive and messy afterwards. Developer cost: £500–£2,000.
The golden rule with structural upgrades is: if you are even considering it, do it now. These changes involve steelwork, Building Regulations, and warranty implications that are all handled seamlessly when done as part of the build but become complex and costly projects if tackled retrospectively.
External Upgrades
External upgrades enhance your home’s kerb appeal and outdoor living potential. While many external improvements are straightforward to arrange independently after completion, some are notably cheaper or more convenient through the developer.
- Block-paved driveway upgrade: upgrading from a standard tarmac drive to a block-paved or resin-bound surface. Developer cost: £1,500–£4,000. Can be done independently for a similar price, but doing it through the developer means the work is complete before you move in.
- Premium turf: upgrading from the standard seed or basic turf to a high-grade cultivated turf laid on improved topsoil. Developer cost: £500–£1,500.
- Upgraded fencing: moving from standard 1.2m closeboard to 1.8m premium panels with concrete posts and gravel boards. Developer cost: £600–£2,000.
- External tap: a rear garden water supply for hosepipes, pressure washers, and paddling pools. Developer cost: £100–£250.
- Patio or decking area: a pre-laid patio in Indian sandstone or porcelain pavers. Developer cost: £1,500–£4,000.
For ideas on making the most of your outdoor space, see our guide to new build garden ideas.
Upgrades That Are Always Worth It
Some upgrades are disproportionately harder, more expensive, or more disruptive to do after your home is built. These are the items where the developer upgrade route delivers the greatest advantage over the DIY-later approach. If your budget is limited, prioritise this list above everything else.
- Quartz or granite worktops: removing a fitted laminate worktop and replacing it with stone means templating, fabrication lead times, disconnecting the sink, and living without a usable kitchen for days. Through the developer: seamless.
- Additional electrical sockets and circuits: chasing into plastered, decorated walls is the textbook example of work that should be done at first-fix stage. The cost doubles or triples after completion.
- Kitchen island plumbing and electrical prep: running water and power supply beneath the kitchen floor is trivial before the screed is laid and virtually impossible afterwards without lifting the entire floor.
- Underfloor heating: must be installed before the floor finish. Retrofitting means lifting every tile or plank, adding the heating system, and re-laying everything.
- Concealed cistern WC frames: require a stud wall built around the frame and connected to the soil pipe — a straightforward job on a bare build but a significant bathroom refit once tiling is complete.
- Bi-fold or sliding doors: widening an opening requires a structural lintel, Building Regulations approval, and significant making-good work to surrounding finishes.
- Cat6 data cabling: running cables through wall cavities and under floors is easy during construction but involves lifting floorboards and drilling through joists afterwards.
- EV charger circuit: a dedicated high-amperage circuit from the consumer unit to the garage wall is quick to install during first-fix but requires significant cable routing after completion.
Upgrades You Can Comfortably DIY Later
Not every upgrade needs to be done through the developer. The following items are easy to source, competitively priced on the high street, and simple to install yourself or with a local tradesperson after you move in — often at a lower cost than the developer charges.
- Decorative light fittings: pendant lights, flush ceiling fittings, and wall sconces are a simple swap from the builder’s basic pendants. Retailers like John Lewis, Made.com, and Pooky offer far wider choice than any developer brochure.
- Curtain poles and blinds: specialists like Hillarys and English Blinds provide made-to-measure options with in-home fitting. Developer blind packages rarely represent good value.
- Smart home devices: smart speakers, smart thermostats (Hive, Nest, tado°), video doorbells, and security cameras are all designed for easy self-installation with no tradesperson needed.
- Internal decoration: feature walls, wallpaper, and bold paint colours are straightforward DIY projects. New build walls provide a perfect, smooth canvas for any finish.
- Garden landscaping and planting: the developer provides a blank canvas; landscaping to your own design at your own pace is more enjoyable and more personal.
- Towel rails and bathroom accessories: replacing a basic heated towel rail with a designer one is a simple plumbing swap, and wall-mounted accessories (toilet roll holders, robe hooks, shelves) require nothing more than a drill and rawl plugs.
- Letterbox, door knocker, and house number: external ironmongery upgrades are inexpensive and take minutes to fit.
Negotiation Strategies
Developer upgrades are not always fixed-price, take-it-or-leave-it propositions. There is often room to negotiate, particularly in certain market conditions. The key is to approach the conversation constructively — developers appreciate buyers who are well-informed and decisive, and a collaborative conversation about upgrades often leads to better outcomes than adversarial haggling.
Negotiation Tips That Work
- Ask about upgrade incentives early: many developers offer free or discounted upgrade packages as part of their sales incentives, especially during launch weekends, end-of-quarter periods, and slower sales months (typically January–February and July–August).
- Bundle your upgrades: requesting a package price for multiple upgrades together often results in a 10–20% discount compared with individual pricing. Developers prefer a single negotiation over multiple small requests.
- Be flexible on specifics: if the developer offers a free flooring package, accept it even if you would have preferred a different brand — free LVT is better than no LVT, and the quality from major developers is always good.
- Mention competitor incentives: if another developer on a nearby site is offering free kitchen upgrades, mentioning this (politely) can motivate your developer to match or improve their offering.
- Negotiate upgrades instead of price reductions: developers are often more willing to include £5,000 of upgrades than to reduce the purchase price by £5,000, because upgrades cost the developer less than face-value (their trade prices are lower than what you pay).
- Time your reservation strategically: the best upgrade deals are typically available on the last plots in a phase, new phase launches (to generate early momentum), and end-of-financial-year sales drives.
- Ask for the show home specification: when a development is nearing sell-out, some developers sell the show home or offer the show home specification (including all premium upgrades) as a package on remaining plots.
Questions to Ask Your Sales Advisor
- “Are there any current upgrade promotions or incentive packages?” — sales advisors are not always proactive about mentioning promotions unless asked.
- “Can upgrades be added to the purchase price rather than paid upfront?” — this is a key question for budget management, and the answer is usually yes.
- “What is included in your premium kitchen/flooring/bathroom package?” — packages are almost always better value than selecting items individually.
- “What are the deadlines for each category of choices?” — knowing exactly when decisions need to be made helps you plan your research.
- “Can I visit a completed home with these upgrades installed?” — seeing upgrades in a real home (rather than just a sample board) makes a huge difference to your confidence.
- “Is there any flexibility on the pricing if I choose several upgrades together?” — a direct, polite ask often yields a discount.
- “What happens if I change my mind after confirming?” — understanding the change policy avoids stress later.
Financing Upgrades and Mortgage Impact
One of the most attractive aspects of developer upgrades is that they can often be added to your purchase price and therefore included in your mortgage. This means you spread the cost over 25–30 years rather than paying a lump sum on the day. The impact on your monthly mortgage payment is surprisingly small.
Consider the maths: £5,000 of upgrades added to a 30-year mortgage at a rate of 4.5% increases your monthly payment by approximately £25. That £25 per month buys you quartz worktops, premium flooring, and additional sockets — improvements you enjoy every single day. It is one of the most efficient ways to finance home improvements.
- Confirm with your mortgage advisor that adding upgrades to the purchase price is acceptable to your lender. Most lenders are comfortable with this, provided the total purchase price (including upgrades) is supported by the valuation.
- Request a revised mortgage illustration showing the new monthly payment with upgrades included, so you can see the exact impact on your budget.
- Check the valuation implications: in most cases, a well-specified home with quality upgrades values at or above the purchase price, so the upgrades effectively pay for themselves in equity terms.
- Compare lump-sum payment versus mortgage inclusion: if you have savings available, paying upfront avoids interest charges over the mortgage term. But if cash is tight, mortgage inclusion is a sensible, low-impact option.
- Ask about developer finance incentives: some developers offer contribution to legal fees, stamp duty, or mortgage costs that can offset the cost of upgrades indirectly.
The important thing to remember is that upgrades added to the purchase price are not the same as borrowing on a credit card or personal loan. Mortgage interest rates are significantly lower than consumer credit rates, and the upgrades add tangible value to the asset you are borrowing against. For a complete guide to the financial side of buying, see our new build buying process guide.
Resale Value Considerations
While you should always choose upgrades primarily because they improve your daily life, understanding their impact on future resale value helps you prioritise when the budget is tight. Estate agents across the UK consistently identify certain upgrades as particularly attractive to future buyers.
Upgrades That Add the Most Resale Value
- Quartz worktops: estate agents estimate a premium kitchen worktop adds £3,000–£7,000 to perceived property value — often more than the upgrade cost.
- Quality flooring throughout: consistent, high-quality flooring (LVT or engineered wood downstairs, premium carpet upstairs) creates immediate buyer appeal and can add £2,000–£5,000 to perceived value.
- Bi-fold doors: a feature that photographs beautifully on Rightmove and creates the open-plan, indoor-outdoor living space that modern buyers actively search for.
- Fitted wardrobes in the main bedroom: built-in storage consistently ranks in buyer surveys as one of the top five most-desired features in a home.
- EV charger or dedicated circuit: with the 2035 petrol/diesel ban approaching, EV readiness is becoming a genuine selling point, especially in suburban and commuter-belt locations.
- Well-tiled bathrooms: full-height tiling with quality porcelain creates an immediate impression of a premium home — bathrooms are one of the first rooms buyers judge.
The upgrades that tend to have the least impact on resale value are purely personal choices — unusual paint colours, niche appliances (like wine coolers in modest homes), and very high-specification items that exceed the expectations for the property’s price bracket. A £3,000 Quooker tap adds perceived value in a £500,000 home but is less impactful in a £220,000 starter home. Match your upgrade ambitions to the property’s market position for the best return. For more on adding value, see our guide to adding value to your new build.
The Complete Upgrade Decision Matrix
This decision matrix brings everything together in a single reference table. It categorises every major upgrade into three tiers: Always Choose (upgrades that are significantly cheaper or easier through the developer), Consider (good value but not essential through the developer), and Usually Skip (items that are equally easy and often cheaper to do independently after completion).
| Upgrade | Category | Reason |
|---|---|---|
| Quartz / granite worktops | Always Choose | 30–40% cheaper; avoids disruptive removal of laminate worktop |
| Additional electrical sockets | Always Choose | 50–60% cheaper at first-fix; avoids chasing into finished walls |
| Kitchen island plumbing / electrical prep | Always Choose | 70–80% cheaper; virtually impossible after screed is laid |
| Cat6 ethernet data cabling | Always Choose | 50–60% cheaper; avoids lifting floorboards and drilling joists |
| EV charger dedicated circuit | Always Choose | 60% cheaper; essential future-proofing for 2035 EV transition |
| Underfloor heating (bathroom / kitchen) | Always Choose | Must be installed before floor finish; near-impossible to retrofit |
| Bi-fold / sliding patio doors | Always Choose | Structural lintel required; 40–50% cheaper during build |
| LVT flooring (ground floor) | Always Choose | Competitive pricing; installed before you move in, no disruption |
| Boiling water tap | Consider | 15–25% cheaper; clean installation but can be retrofitted |
| Premium carpet (bedrooms) | Consider | Convenient pre-move-in install; modest savings versus independent fitter |
| Bathroom wall tile upgrade | Consider | Good value in the package; can be retiled later but messy |
| Vanity unit and concealed cistern | Consider | Best done during build for concealed cistern; vanity alone is easy to swap |
| Fitted wardrobes | Consider | Competitive pricing; seamless finish with surrounding decoration |
| Induction hob upgrade | Consider | Simple appliance swap but may need circuit upgrade — easier during build |
| Garden lighting circuit | Consider | Cheap during build; saves significant cost versus routing cables later |
| Upgraded driveway | Consider | Similar cost either way; convenience of pre-completion is the benefit |
| Decorative light fittings | Usually Skip | Much wider choice on high street; simple self-install |
| Curtains and blinds | Usually Skip | Specialist retailers offer better value and wider selection |
| Smart home devices | Usually Skip | Designed for easy self-install; technology changes rapidly |
| Internal decoration (feature walls, wallpaper) | Usually Skip | Easy DIY; unlimited product choice after completion |
| Garden landscaping and planting | Usually Skip | More personal, more enjoyable, and more flexible when done yourself |
| Bathroom accessories (towel rings, hooks) | Usually Skip | Inexpensive, huge variety online, takes minutes to fit |
Use this matrix as your starting point at the choices appointment. Focus your budget on the “Always Choose” column first, then work through the “Consider” items in order of personal priority, and leave the “Usually Skip” category for after you move in.
Budget Scenarios for Every Buyer
To help you plan your upgrade spending, here are three realistic budget scenarios for a typical three-or-four-bedroom new build home in the UK in 2026. These represent the cumulative cost of the upgrades listed above, from essential-only through to comprehensive.
- Essential upgrades — £2,000–£4,000: Quartz worktops, LVT to the hallway and kitchen, dimmer switches in key rooms, six additional double sockets, and two USB charging sockets. This modest package focuses on the items that are hardest to retrofit and delivers noticeable daily benefit. Added to a 30-year mortgage, this costs roughly £10–£20 per month.
- Considered upgrades — £5,000–£10,000: Everything above plus a boiling water tap, LVT extended to the living area, premium carpet upstairs, enhanced bathroom tiles with a vanity unit, a comprehensive electrical package (10 sockets, garden lighting prep, outdoor socket, EV circuit), Cat6 to three rooms, and fitted wardrobes in the main bedroom. This level creates a home that feels genuinely premium. Monthly mortgage impact: approximately £25–£50.
- Comprehensive upgrades — £12,000–£22,000+: Full premium kitchen package (quartz, upgraded cabinets, induction hob, boiling water tap, under-cabinet lighting), whole-house flooring (LVT downstairs, premium wool carpet upstairs), complete bathroom upgrades in all bathrooms, fitted wardrobes in two bedrooms, bi-fold doors to the garden, full electrical and smart home prep package, and potentially a garage conversion. At this level, you are moving into an exceptionally well-specified home. Monthly mortgage impact: approximately £60–£110.
Final Thoughts
Developer upgrades are a genuinely valuable opportunity that is unique to buying a new build home. The ability to have professional tradespeople install premium materials, appliances, and fixtures as part of the integrated build programme — with everything coordinated, quality-controlled, and covered by warranty — is an advantage that second-hand property buyers simply do not have.
The strategy that delivers the best results is straightforward: spend your upgrade budget on the things that are hardest to change later (worktops, electrics, plumbing, structural openings, underfloor heating) and save the purely decorative decisions (light fittings, smart devices, curtains, garden planting) for after you collect the keys. Use the decision matrix in this guide as your reference at the choices appointment, ask plenty of questions, request samples, and take your time.
Whether your budget covers a targeted package of essential upgrades or a comprehensive whole-house transformation, every well-chosen developer upgrade makes your new build feel more like your home from the moment you walk through the door. For more advice on making the most of your purchase, explore our guides to snagging your new home, furnishing on a budget, and essential tips for first-time buyers.