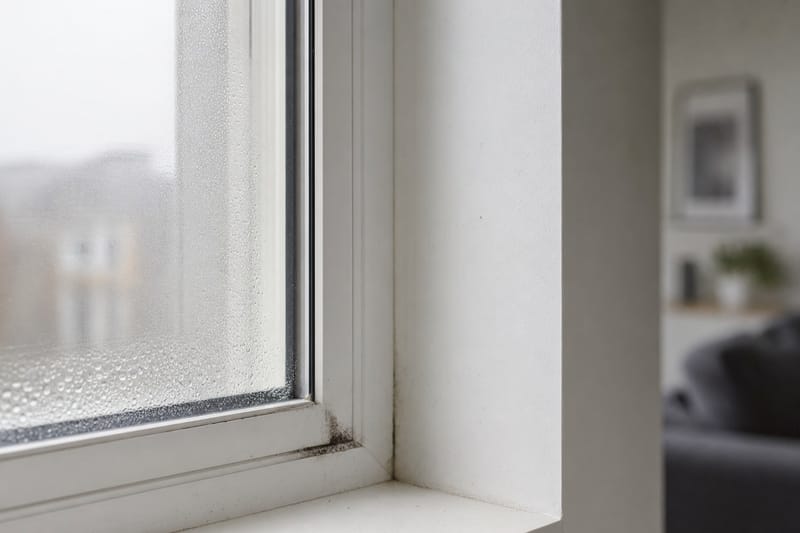
If you've moved into a new build and woken up to streaming windows, damp patches on a chimney breast, or a faint musty smell in a cupboard, you're not alone — and you're probably wondering whether this is new build condensation that's normal, or a genuine snagging defect you should be reporting. The honest answer is: it depends on timing, location and whether it's improving.
A newly built house is, in a very literal sense, wet. The wet trades — plaster, screed, mortar, render, paint — introduce a surprising volume of water into the structure during construction, and that water has to evaporate out somewhere. Industry estimates commonly cited by builders and warranty providers suggest a typical three-bedroom house can contain somewhere in the region of 1,000–2,000 litres of construction water locked into its fabric when you collect your keys, though the exact figure varies hugely by house type, time of year built, and how long it stood before completion. Check the current figure with your specific developer if this matters to your situation.
That moisture doesn't disappear on moving day. It migrates outward through plaster and masonry over the first one to two heating seasons, and along the way it raises the humidity inside your home, which shows up as condensation on the coldest surfaces — almost always single-glazed-feeling spots like window reveals, glass itself, and north-facing external walls. This is genuinely normal and is sometimes called "construction moisture drying out new build" by site managers and in NHBC guidance documents.
But "some drying out is normal" is not the same as "any amount of damp is fine, forever." Persistent damp patches that don't fade, recurring black mould that returns within days of cleaning, condensation that is just as bad in month eight as month one, or moisture appearing somewhere other than cold glass and reveals (skirting boards, under windows on external walls, around extractor fans, in lofts) usually point to something mechanical: a ventilation system that isn't working, a thermal bridge, a missed damp-proof detail, or a heating pattern that isn't suited to an airtight new home.
This guide walks through how to tell the difference, how background ventilation and MVHR are supposed to work in a modern new build, what a realistic drying-out timeline looks like, and what evidence to gather before you raise it formally with your developer. If you haven't already had your home professionally inspected, it's worth reading our guide on professional new build snagging surveys and whether they're worth it alongside this one.
Why New Builds Are Genuinely Wet When You Move In
It helps to understand where all this water actually comes from, because it changes how you read what you're seeing on your windows each morning.
- Wet plaster: A typical house uses many tonnes of wet plaster across its internal walls and ceilings. Plaster is mixed with water on site and, while it sets (goes hard) within hours, it doesn't fully dry (lose its moisture to the air) for weeks or months, depending on thickness and ventilation.
- Floor screed: Sand-and-cement screed laid over concrete floors, or under some underfloor heating systems, can take a particularly long time to dry fully — often quoted as roughly one millimetre of depth per day under good drying conditions, meaning a 65mm screed could theoretically take two months or more, slower in cold, damp weather.
- Masonry and mortar: Brickwork, blockwork and the mortar joints between them are built using wet mixes and can hold significant residual moisture, particularly in cavity walls built through a wet autumn or winter.
- Paint and decoration: Even emulsion and trade paints release moisture into the air as they cure, adding to the humidity load in the first few weeks of occupation.
- Your own lifestyle: Cooking, showering, drying laundry indoors and simply breathing add several litres of water vapour into the air every single day — in an older, draughtier house this used to escape through gaps; in an airtight new build it has to be removed deliberately through ventilation.
Modern new builds are built to be significantly more airtight than older housing stock, as part of meeting current Building Regulations Part L (England) and equivalent standards elsewhere in the UK, which is good for energy bills but means moisture has far fewer accidental escape routes than it did in a draughty Victorian terrace. That's precisely why the ventilation system installed in your home — whether simple extractor fans and trickle vents, or a whole-house MVHR unit — isn't a luxury extra; it's doing a genuinely load-bearing job in moisture management.
A house that feels slightly damp and smells faintly of fresh plaster in its first winter is not unusual. A house that still feels that way at eighteen months, after two full heating seasons, is a different story.
This combination — a wet structure plus an airtight shell plus a ventilation system that has to work correctly from day one — is exactly why damp and condensation complaints are one of the most common new build snagging issues reported in the first two years, and why distinguishing "normal" from "defect" matters so much for how you respond.
A Realistic Drying-Out Timeline
Every house is different, but the pattern below reflects what developers, warranty providers and building scientists typically describe as a normal drying-out curve for a standard brick-and-block or timber-frame new build in the UK. Use it as a rough guide, not a guarantee — your specific build method, completion season and heating habits will shift these numbers.
| Time since completion | What's typically still happening | What you might notice |
|---|---|---|
| 0–6 weeks | Paint and surface finishes curing; plaster losing surface moisture | Noticeable window condensation most mornings, especially in bedrooms; faint "new build" smell |
| 2–4 months | Plaster continuing to dry through its depth; screed drying slowly if present | Condensation reducing but still present on coldest mornings; possible fine plaster cracking (see our guide on plaster cracks as snagging or normal settlement) |
| First winter (months 1–4 if completed in autumn) | Peak demand on ventilation system as heating is used and windows stay shut | This is usually the worst period for condensation — expected, provided it's confined to glass and cold reveals |
| 6–9 months | Bulk of plaster and screed moisture released; structure approaching equilibrium | Condensation should be visibly less frequent and less severe than month one |
| 12 months | End of first full year; most construction moisture should have left the building | Occasional condensation on very cold nights is still normal; daily streaming windows is not |
| 18–24 months | Structure should be at normal equilibrium moisture content | Any persistent damp, mould or condensation by this point is very unlikely to be drying-out and should be investigated as a possible defect |
Your second winter in the property is a useful checkpoint for more than just damp — it's also roughly when your two-year developer warranty period (distinct from the longer 10–12 year structural warranty from NHBC, LABC or a similar provider) is coming to a close. Our guide to second year snagging before your warranty expires covers the full checklist of what to inspect before that window shuts, and damp/ventilation issues should be firmly on that list if they haven't resolved.
Normal Condensation vs Warning Signs: Telling Them Apart
Location, pattern and progression matter far more than the simple presence of moisture. Use this comparison as your first filter before deciding whether to log a snagging item.
| Feature | Likely normal drying-out | Likely a defect worth reporting |
|---|---|---|
| Location | Window glass, aluminium/uPVC frames, window reveals, cold external corners | Skirting boards, carpet edges, around light switches/sockets on external walls, ceiling corners away from windows |
| Timing | Worse on cold, still mornings; mostly first autumn/winter | Present year-round, or reappearing immediately after you've dried and cleaned it |
| Trend over months | Visibly reducing month on month | Static or getting worse despite normal heating and ventilation use |
| Smell | Faint, generic "new plaster" smell that fades | Persistent musty or earthy smell that doesn't fade, especially in one specific room or cupboard |
| Mould | None, or very occasional faint spotting that wipes away and doesn't return | Black mould that returns within a week of cleaning, or spreads |
| Extent | Scattered, affects several rooms similarly (whole-house drying) | Concentrated in one room, one wall, or one corner while the rest of the house is fine |
| Response to heating/ventilation | Improves noticeably when you heat consistently and run extractor fans/trickle vents | Doesn't improve even with consistent heating, open trickle vents and extractor use |
The single most useful diagnostic question is simply: is this the same, better, or worse than three months ago? Drying-out moisture follows a downward curve. A genuine defect — a disconnected MVHR duct, a missing cavity tray, a cold bridge at a window lintel, an extractor fan wired to the wrong switch — tends to produce a flat or worsening pattern that doesn't respond to you doing everything "right."
One damp patch that's new, localised, and not improving is worth investigating properly even if the rest of the house is drying out exactly as expected. Don't let a correct general explanation talk you out of a specific local problem.
It's also worth distinguishing condensation dampness from penetrating or rising damp, which are much rarer in a genuinely new structure but not impossible — a missed damp-proof course detail, a poorly sealed window-to-wall junction, or a defective roof detail can let water in from outside rather than from the air inside. Penetrating damp tends to produce damp patches that track with rainfall and wind direction rather than cold mornings, and often feels damp to the touch rather than simply showing condensation droplets.
How Background Ventilation Is Supposed to Work
Most new builds in the UK that don't have MVHR rely on what's called "background ventilation plus intermittent extract" — a combination of small, mostly passive features and a handful of powered fans, all designed to work together continuously, even when you're not actively thinking about it.
- Trickle vents: The small slotted vents built into the top of your window frames. They're designed to stay open permanently to provide constant background airflow, diluting moisture and pollutants even overnight. Many buyers close them in winter to stop draughts — this is one of the single biggest causes of avoidable condensation complaints in new builds, because closing trickle vents removes the background ventilation the whole design relies on.
- Intermittent extract fans: Powered fans in kitchens, bathrooms and en suites, usually linked to the light switch or a humidity sensor, designed to clear large bursts of moisture (a shower, a boiling pan) quickly. They typically run for several minutes after the light is switched off via a timer or overrun.
- Passive stack ventilation (less common): Some developments use vertical ducts that rely on natural pressure differences to draw stale, humid air out of wet rooms without a fan.
- Air bricks and underfloor ventilation: On suspended timber ground floors, air bricks keep the sub-floor void ventilated to prevent damp building up beneath the house — these are easily and sometimes accidentally blocked by landscaping, decking, or raised flower beds during the first year of occupation.
Extractor fans are required by Building Regulations Part F to achieve a minimum extract rate, and in a snagging context it's worth physically checking that fans actually work, run at a reasonable speed, vent to the outside air (not into a loft space, which just relocates the moisture problem), and that any humidity sensor or timer override is functioning rather than switched off at installation and never reset.
A simple test: hold a piece of tissue paper near a running extractor grille — it should be pulled toward the fan, not hang limp. If a bathroom fan sounds like it's running but produces almost no pull, that's a legitimate snagging item, not something you need to live with as "normal drying out."
It's also worth checking that vents and grilles weren't painted over, taped shut during construction and forgotten, or left with protective film in place — all genuinely common, genuinely easy-to-miss snagging finds that directly explain a condensation problem that otherwise looks mysterious.
MVHR Systems and Condensation: What Can Go Wrong
A growing share of new builds, particularly those built to higher energy efficiency standards or in flats and apartment blocks, use Mechanical Ventilation with Heat Recovery (MVHR) instead of trickle vents and individual extractor fans. Understanding roughly how it works helps you spot when it isn't working.
An MVHR system continuously extracts stale, humid air from "wet" rooms (kitchen, bathrooms, utility) through a network of ducts to a central unit, usually in a loft, cupboard or utility space. Inside the unit, a heat exchanger transfers warmth from that outgoing air into fresh air drawn in from outside, which is then ducted into "dry" rooms (bedrooms, living rooms) — giving you continuous fresh air without opening windows and losing heat. When it's commissioned and balanced correctly, it should run quietly, continuously, and keep indoor humidity within a comfortable range without you noticing it at all.
The problem is that new build MVHR condensation complaints are disproportionately common, and the causes are almost always installation or commissioning issues rather than the technology itself:
- Unbalanced airflow: If extract and supply volumes aren't correctly balanced at commissioning, some rooms get too little fresh air while others feel like a wind tunnel — under-ventilated rooms will show condensation despite the system technically "working."
- Blocked or crushed ducting: Flexible ducting squashed behind a loft hatch, kinked around a joist, or disconnected entirely during a later trade's work (an electrician or plumber working in the loft) will silently kill airflow to one or more rooms.
- Filters never changed: MVHR filters need periodic replacement (check your specific unit's handbook, but every 6–12 months is a common interval); a clogged filter starves the whole system.
- Unit switched to low/trickle/holiday mode and left there: Many units have adjustable speed settings; if yours was commissioned on a low setting and never adjusted, it may be under-delivering for your household's occupancy and moisture load.
- System never commissioned properly at all: Commissioning should include measuring and recording actual airflow rates at each vent against design figures — ask your developer for your home's commissioning certificate; if they can't produce one, that's a legitimate line of enquiry.
If you have MVHR and you're seeing persistent condensation, start by checking the obvious things yourself: is the unit audibly running at all; are vents in every room actually blowing or pulling air when you hold tissue near them; has the filter indicator light come on. If all of that checks out and problems persist, request that the developer or installer re-measure airflow rates against the original design specification — this is a measurable, objective test, not a subjective judgement call, and it's the strongest evidence you can bring to a snagging claim.
Black Mould on New Build Windows: Causes and What to Do
A thin ring of black spotting along a window's bottom seal or in a corner of the frame in the first winter, which wipes off and takes weeks to return (if it returns at all), is a common and usually low-stakes side effect of drying-out condensation settling repeatedly on the coldest surface in the room. It's unpleasant to look at but typically responds to basic management: wiping it down with a mould-specific or diluted bleach-based cleaner, drying the surface thoroughly, and improving airflow and heating in that room.
What should concern you more is black mould on a new build window that:
- Spreads beyond the window reveal onto the surrounding plaster or ceiling
- Returns within days rather than weeks of cleaning
- Is accompanied by a visible gap, cold draught, or damp staining in the frame-to-wall junction (suggesting a sealing or cavity closer defect rather than simple condensation)
- Appears on more than one or two windows simultaneously across the house, especially on different orientations
- Comes with a persistent musty smell in that specific room that doesn't match the rest of the house
Windows are a common focus for genuine snagging defects because they sit at a thermal and structural junction — frame, cavity closer, insulation, plasterboard and sometimes a lintel all meet at that point, and a gap or missing insulation detail at any one of them creates a cold bridge that will condense moisture reliably regardless of how well the rest of your ventilation is performing. A thermal imaging camera, which many professional snagging inspectors carry, can usually show this clearly as a cold stripe around the frame compared to the surrounding wall.
Black mould that keeps coming back in exactly the same spot despite cleaning and ventilating is telling you something structural is cold there — it's rarely "just" a cleaning problem at that point.
From a health perspective, don't wait for a perfect diagnosis before reducing your exposure: ventilate the room as well as you can in the meantime, avoid drying laundry on radiators near the affected window, and treat visible mould promptly with appropriate cleaning products, particularly in bedrooms used by children, older people, or anyone with respiratory conditions, while you pursue the underlying fix with your developer.
Photograph mould patches with a ruler or coin in shot for scale, note the date, and keep a simple log each time you clean it and how quickly it returns — this record becomes valuable evidence later, which we cover in more detail below.
Thermal Bridging and Other Building Defects That Cause Persistent Damp
Beyond ventilation faults, several structural and insulation defects can produce damp or condensation that looks superficially similar to normal drying-out but is actually a fabric problem that won't resolve on its own.
| Defect | What it looks like | Why it happens |
|---|---|---|
| Cold bridging at lintels/junctions | A persistent cold stripe and condensation/mould line, often horizontal above a window or at a floor-to-wall junction | Missing or compressed insulation at a structural junction lets heat (and therefore warmth that would keep the surface above dew point) escape locally |
| Missing or displaced cavity insulation | A patch of a wall that's noticeably colder to the touch than the rest, sometimes with a visible patch of condensation | Cavity wall insulation batts dislodged, gapped, or omitted during construction |
| Blocked or missing wall ties/cavity trays | Damp patches that appear after heavy rain rather than simply on cold mornings | Water bridging the cavity via debris on wall ties, or a missing cavity tray above a window/door lets water track inward |
| Render or brickwork defects | Localised damp staining on an external wall, often near a specific crack or poorly pointed area | Water penetration through a faulty external finish rather than internal condensation |
| Blocked underfloor ventilation | Musty smell from ground floor, occasionally visible damp at skirting level | Air bricks blocked by external landscaping, decking or raised beds restricting sub-floor airflow |
| Roof or flashing defects | Damp patch on a ceiling, often near a chimney, roof light or valley, that grows after rain | Penetrating water from a roofing or flashing fault, unrelated to internal humidity |
The practical distinction in every row above is the same: these problems correlate with weather, location and structure rather than simply with cold mornings and heating patterns. If a damp patch gets visibly worse after a storm, or is confined to one external wall while every other wall in the house is fine, you're very likely looking at a building fabric defect rather than condensation from drying out, and it's worth escalating as a potential structural warranty matter (NHBC, LABC, Premier Guarantee or equivalent) as well as a standard snagging item, particularly if it involves water ingress rather than internal humidity. For background on how these inspection regimes differ, see our explainer on LABC vs NHBC inspections and build quality oversight.
A Simple Decision Checklist: Drying-Out or Defect?
When you're standing in front of a damp window or a mould patch trying to decide whether it's worth a formal snagging report, work through these questions in order.
- How old is the home? Under six months, lean toward drying-out unless the location or pattern is unusual. Over twelve months, lean toward investigating.
- Where exactly is it? Glass, frames and cold reveals — probably normal. Skirting boards, sockets, ceilings away from windows, or a single isolated wall — investigate.
- Is it improving, static, or worsening month to month? Improving is consistent with drying-out. Static or worsening is not.
- Have you actually been using the ventilation as designed? Trickle vents open, extractor fans run during and after showers/cooking, MVHR unit audibly running, furniture pulled away from external walls. If not, correct this first and reassess after a few weeks.
- Does it correlate with weather (rain, wind direction) rather than temperature? If yes, suspect penetrating damp rather than condensation — a different, usually more urgent, category of defect.
- Is it confined to one room or spot while the rest of the house is fine? Localised problems in an otherwise normal house point to a specific defect (a duct, a cold bridge, a sealing gap) rather than whole-house drying-out.
- Does cleaning mould buy you weeks of improvement, or days? Weeks suggests a manageable, reducing issue. Days suggests an ongoing moisture source that needs fixing, not just cleaning.
Remember that these two categories aren't always mutually exclusive in a real house: you can have genuine drying-out moisture happening in most rooms while also having one specific ducting fault in the en suite. Don't let a reasonable general explanation ("it's a new house, that's normal") stop you from pursuing a specific, localised, non-improving problem on its own merits.
Evidence to Gather Before Raising a Snagging Claim
Damp and condensation claims are won or lost on evidence, because "it feels damp" is subjective and easy for a developer to dismiss as normal drying-out, while a dated, measured, photographed record is much harder to wave away.
- A dated photo log: Photograph the same spot weekly or fortnightly, in similar lighting, ideally with a ruler, coin or tape measure in frame for scale. This builds the "improving vs static vs worsening" trend line that matters more than any single photo.
- A simple humidity reading: A cheap plug-in or battery hygrometer (often under £15) left in the affected room lets you note relative humidity over time. Persistently high readings (consistently above roughly 65–70% indoor relative humidity with normal heating and ventilation in use) are useful objective evidence of a ventilation shortfall rather than a lifestyle issue.
- A usage diary: Note when you heat, when you run extractor fans or open trickle vents, and whether the problem responds. This pre-empts the developer's most common first response — "have you been ventilating/heating correctly?" — by showing you have.
- The commissioning certificate (MVHR homes): Request this from your developer; it should record designed vs achieved airflow at each vent.
- A thermal image, if you can get one: Many professional snagging inspectors carry a thermal camera as standard; it can show cold bridging at junctions in a way that's hard to argue with.
- Weather correlation notes: If you suspect penetrating damp rather than condensation, note the date, rainfall and wind direction each time a patch appears or worsens.
- Your snagging report reference: If you commissioned an independent snagging survey, cross-reference the item number; developers generally take independently documented items more seriously than verbal complaints. See our guide on creating a professional snagging report for a template approach to structuring this evidence.
Submit everything in writing (email, or through your developer's customer portal if they have one) rather than relying on a verbal conversation with a site manager, and keep copies of every response you receive, including dates. This record becomes essential if the issue isn't resolved and you need to escalate to the New Homes Quality Board, your warranty provider, or, in the most persistent cases, the Consumer Code for Home Builders' independent dispute resolution scheme.
Who Is Responsible: Developer, Warranty Provider, or You?
Responsibility for damp and condensation issues in a new build generally falls into one of a few categories, and it's worth understanding the difference because it affects who you contact and how.
| Issue type | Typically covered by | Typical timeframe to raise |
|---|---|---|
| Normal construction drying-out moisture | Not a defect — manage yourself with heating/ventilation | N/A — expected to resolve naturally within 12–24 months |
| Ventilation system fault (fan not working, MVHR not commissioned correctly, blocked duct) | Developer's 2-year warranty / customer care team | As soon as identified; most developer warranties run two years from legal completion |
| Cold bridging / missing insulation at a specific point | Developer's 2-year warranty; may also fall under structural warranty (NHBC/LABC/Premier) if severe | Within the 2-year defects period ideally; structural warranties typically run 10–12 years for major issues |
| Penetrating damp from a building fabric fault (missing cavity tray, defective flashing, faulty render) | Developer warranty, escalating to structural warranty provider if unresolved | As soon as identified — water ingress can cause ongoing hidden damage |
| Condensation worsened by your own habits (closed trickle vents, no extractor use, drying laundry indoors on radiators) | You, by adjusting habits | Ongoing |
In practice, the first port of call for almost any snagging-style issue, including damp and condensation, is your developer's customer care or aftercare team, using whatever formal process they operate (often a portal or dedicated snagging line). Our guide on how the developer snagging rectification process works explains the typical stages, and post-completion snagging rights and timelines covers what you're entitled to expect and by when.
If the developer doesn't resolve a ventilation or fabric issue to a reasonable standard, your next steps typically involve the New Homes Quality Board (for homes covered by the New Homes Quality Code) or the Consumer Code for Home Builders, both of which offer independent dispute resolution processes, and ultimately your structural warranty provider if the issue is serious enough to meet their claims threshold. Keep in mind that structural warranties are generally reserved for significant defects affecting the structure or weathertightness of the home — routine condensation on its own is unlikely to meet that bar, but a cold bridge causing recurring damage, or water penetration through a building fabric defect, often will.
Managing Condensation Yourself While You Wait for a Fix
Whether you're genuinely in a normal drying-out period or waiting for a developer to investigate a potential defect, there's a lot you can do in the meantime to reduce the humidity load and protect your home and health.
- Keep trickle vents open. It feels counterintuitive in cold weather, but closing them removes the background ventilation the whole house design depends on. A slightly cooler draught is usually preferable to accumulating humidity.
- Heat consistently, not intermittently. A steady, moderate background temperature (many heating engineers suggest roughly 18–20°C as a reasonable baseline) keeps surface temperatures above the dew point far more effectively than blasting heat for an hour and letting the house go cold.
- Use extractor fans properly. Run them during and for a good 15–20 minutes after cooking or showering; don't switch off a timer-linked fan at the isolator to "save electricity."
- Avoid drying laundry on radiators indoors where possible, or at minimum, keep the door shut and a window cracked/extractor running while you do, to stop that moisture spreading through the house.
- Leave a gap behind furniture on external walls. A wardrobe or headboard pushed flush against a cold external wall traps still, humid air against the surface — a common cause of localised mould that isn't actually a building defect.
- Keep internal doors slightly open where practical to allow air to circulate between rooms, especially if you don't have whole-house MVHR.
- Don't block air bricks or vents with external landscaping, storage, or draught excluders over trickle vents.
- Wipe down condensation promptly each morning in the worst-affected rooms during the first winter — it's tedious, but it genuinely reduces the chance of mould establishing itself while the structure is still drying.
If you're also dealing with the opposite seasonal problem — a new build that overheats badly in summer because of the same airtight, well-insulated construction — it's worth reading our related guide on overheating risk in new build homes, causes and fixes, since ventilation strategy touches both issues.
Frequently Asked Questions
Is condensation on new build windows always normal?
Not always, but it's common and expected in the first winter as construction moisture dries out of plaster, screed and masonry. It becomes a concern when it doesn't improve over several months, spreads beyond window glass and reveals, or is accompanied by recurring black mould that returns quickly after cleaning.
How long does a new build take to fully dry out?
Most of the bulk construction moisture leaves the structure within the first 6–12 months, with the house reaching a stable equilibrium moisture content typically by 18–24 months. Screed and thicker masonry elements can take longer than plaster. These are general guides, not guarantees — your specific build method and the season it was built in both affect the timeline.
Should I keep my trickle vents open in winter even though it feels draughty?
Yes, generally. Trickle vents are designed to provide continuous background ventilation that your home's moisture management relies on. Closing them is one of the most common self-inflicted causes of worsening condensation in new builds. If the draught genuinely feels excessive, raise it as a separate snagging query about vent sizing or placement rather than permanently closing them.
My MVHR unit is running but I still get condensation — what should I check first?
Check that every room's vent is actually blowing or pulling air (tissue test), check the filter hasn't clogged, and check the unit hasn't been left on a low or "boost off" setting. If all of that is fine, ask your developer for the original commissioning certificate and request a re-test of airflow rates against the design specification — unbalanced or under-commissioned systems are a common and fixable cause.
Can I claim on my NHBC or structural warranty for condensation?
Usually not for ordinary condensation on its own, since structural warranties (NHBC, LABC, Premier Guarantee and similar) generally cover significant structural and weathertightness defects rather than routine humidity. However, if condensation or damp is caused by a genuine building fabric defect — a missing cavity tray, a major thermal bridge, water penetration — that may well meet the claims threshold. Raise it with your developer's customer care team first; they will typically investigate before any warranty claim is considered.
Is black mould on a new build dangerous to my health?
Mould exposure can aggravate respiratory conditions, allergies and asthma, particularly for children, older people and those with existing health conditions. Clean visible mould promptly with appropriate products and improve ventilation while you pursue the underlying cause with your developer; don't wait for a perfect diagnosis before reducing your exposure.
Will opening windows make the condensation worse or better?
Briefly opening windows to purge moist air (for example, after a shower or while cooking) generally helps, especially combined with extractor fan use. Leaving windows wide open for long periods in cold weather can waste heat without necessarily fixing an underlying ventilation defect, so it's a short-term aid, not a long-term solution.
What if my developer says the condensation is "just normal drying out" but I don't agree?
Ask for this in writing, request a date by which they expect it to resolve, and keep your own dated photo and humidity log in the meantime. If it hasn't visibly improved by that date, or by your second winter at the latest, escalate formally through their complaints process, referencing your evidence, and consider involving the New Homes Quality Board or Consumer Code for Home Builders if it remains unresolved.
Next Steps
Whether you're still in your first winter and watching for normal drying-out patterns, or you suspect a genuine ventilation or fabric defect, a few practical next moves will help:
- Start a simple dated photo and humidity log today if you haven't already — it costs nothing and becomes essential evidence if the issue persists.
- If you haven't had an independent inspection, consider a professional snagging survey to check ventilation systems, thermal bridging and window details objectively.
- Browse live new build developments if you're comparing build quality and specification before you buy, and check builder profiles for warranty and aftercare track records.
- Search current new build properties for sale or explore locations on our interactive map.
- Use our buyer tools to help with budgeting, mortgage comparisons and snagging checklists, and compare developments and builders side by side before you commit.
Damp and condensation in a brand-new home is rarely a simple yes-or-no question — it's a pattern you track over months, not a single morning's observation. Give your home a fair chance to dry out through its first heating season, use the ventilation exactly as designed, but don't let a reasonable general explanation stop you from pursuing a specific, localised problem that genuinely isn't improving.